> ## Documentation Index
> Fetch the complete documentation index at: https://lilinji.mintlify.site/llms.txt
> Use this file to discover all available pages before exploring further.
# 第01讲:AI Infra 工程师的 C++ 与 Python 底层必修课
> 掌握 AI Infra 开发所需的物理内存模型、RAII 显存生命周期、std::move 零拷贝、PyBind11 跨语言桥接与 PyTorch ATen C++ 扩展开发实战。
# 第01讲:AI Infra 工程师的 C++ 与 Python 底层必修课
> **主讲人**:👓 **Ringi**(AI Infrastructure 工程师)\
> **所属模块**:[Module 00:性能工程与系统前置](/01_性能工程与系统前置/README)\
> **关键词**:C++17 / RAII / 智能指针 / 移动语义 / 模板 / PyBind11 / ATen / PyTorch C++ Extension / Autograd\
> **学习目标**:建立从 Python API 一路追踪到 C++、ATen、CUDA/设备执行层的能力,并能够独立编写、编译、导入和验证一个最小 PyTorch C++ 扩展。
AI Infra 处在算法、框架、编译器、操作系统和硬件的交界处。同一个问题往往要在多种语言和工具之间来回切换:用 Python 描述模型与实验,用 C++ 实现性能敏感路径,用 CUDA 驱动 GPU,再用 Linux 工具定位进程、内存、动态库和网络问题。
本讲不追求把 C++ 语法完整背一遍,而是建立一条贯通算力底座的主线:**能读懂、能修改、能调试,也知道每一微秒性能成本与显存开销发生在哪里**。
## 📑 目录导航
* [0. Ringi 开场:为什么会 Python 还远远不够?](#0-ringi-开场为什么会-python-还远远不够)
* [0.1 Python 更像“控制面”,C++ 更像“数据面”](#01-python-更像控制面c-更像数据面)
* [0.2 Python 的性能开销到底在哪里?](#02-python-的性能开销到底在哪里)
* [0.3 什么时候应该下沉到 C++?](#03-什么时候应该下沉到-c)
* [1. 现代 C++(C++11/14/17)核心必备武器库](#1-现代-cc111417核心必备武器库)
* [1.1 物理直觉:变量、地址、指针与引用](#11-先建立物理直觉变量地址指针与引用)
* [1.5 栈、堆与对象生命周期](#15-栈堆与真正应该关心的东西生命周期)
* [1.6 RAII 资源管理哲学](#16-raii现代-c-最重要的思想之一)
* [1.7 智能指针(unique\_ptr / shared\_ptr / weak\_ptr)](#17-智能指针让所有权写进类型系统)
* [1.8 移动语义:std::move 到底做了什么?](#18-移动语义stdmove-到底做了什么)
* [1.9 完美转发:std::forward](#19-完美转发stdforward)
* [1.10 模板元编程与泛型算子特化](#110-模板为什么-ai--cuda-代码里到处都是-t)
* [2. Python C 扩展与 PyTorch 桥梁:PyBind11 实战](#2-python-c-扩展与-pytorch-桥梁pybind11-深入实战)
* [2.1 Python 如何 import C++ 模块](#21-python-怎么-import-c-扩展模块的)
* [2.3 std::vector vs Python list 性能陷阱](#23-stdvector-vs-python-list一个非常关键的性能陷阱)
* [2.4 真正的 Zero-Copy 协议](#24-真正的-zero-copy-应该看什么)
* [2.5 PyBind11 与 GIL 释放机制](#25-pybind11-与-gil)
* [3. PyTorch C++ 扩展:从 torch::Tensor 到 ATen](#3-pytorch-c-扩展从-torchtensor-到-aten)
* [3.1 ATen 核心底座](#31-pytorch-的-c-底座aten)
* [3.2 at::Tensor 三层物理架构解构](#32-attensor-不是整块数据对象)
* [4. 手写 PyTorch C++ Extension 算子实战](#4-手写第一个-pytorch-c-extension)
* [5. 编译模式:JIT 即时编译 vs AOT 预编译](#5-编译与分发模式jit-vs-aot)
* [6. 大厂 AI Infra 避坑指南与经典面试题](#6-ringi-避坑指南)
* [7. 总结与自我检验清单](#7-总结与自我检验清单)
***
## 写在前面:这不是一篇“C++ 语法大全”
很多同学第一次接触 AI Infra,会有一个很自然的疑问:
> “我会 Python,也会 `import torch`,模型能训练、能推理,为什么还要学 C++?”
如果你的目标只是调用现成模型,Python 确实已经足够强大。
但如果你的目标是下面这些工作:
* 优化大模型推理延迟;
* 修改 vLLM / TensorRT-LLM / SGLang 的核心执行路径;
* 编写 CUDA Kernel;
* 定位 PyTorch 算子性能问题;
* 处理 Tensor 的生命周期、显存与 Stream;
* 排查 NCCL、CUDA Runtime、动态链接库问题;
* 为 PyTorch 增加自定义算子;
* 阅读框架内部 Dispatcher / ATen / C10 代码;
* 做 CPU / GPU 性能工程;
那么只会 Python 很快就会撞到一堵墙。
AI Infra 的真实调用链通常更像这样:
```text theme={null}
Python 用户代码
│
▼
PyTorch Python API
│
▼
Dispatcher / ATen / C10(C++)
│
├── CPU Kernel(C++ / SIMD)
│
└── CUDA Kernel / cuBLAS / cuDNN / NCCL
│
▼
GPU Runtime / Driver / Hardware
```
你在 Python 里写下:
```python theme={null}
y = torch.matmul(x, w)
```
看起来只是一行代码,但真正干活的部分通常并不在 Python。
**AI Infra 工程师最重要的能力,不是背多少 C++ 语法,而是能沿着这条调用链向下追踪:数据在哪里、谁拥有它、什么时候释放、有没有复制、在哪个设备执行、由哪个线程或 Stream 调度。**
***
# 0. Ringi 开场:为什么会 Python 还远远不够?
## 0.1 Python 更像“控制面”,C++ 更像“数据面”
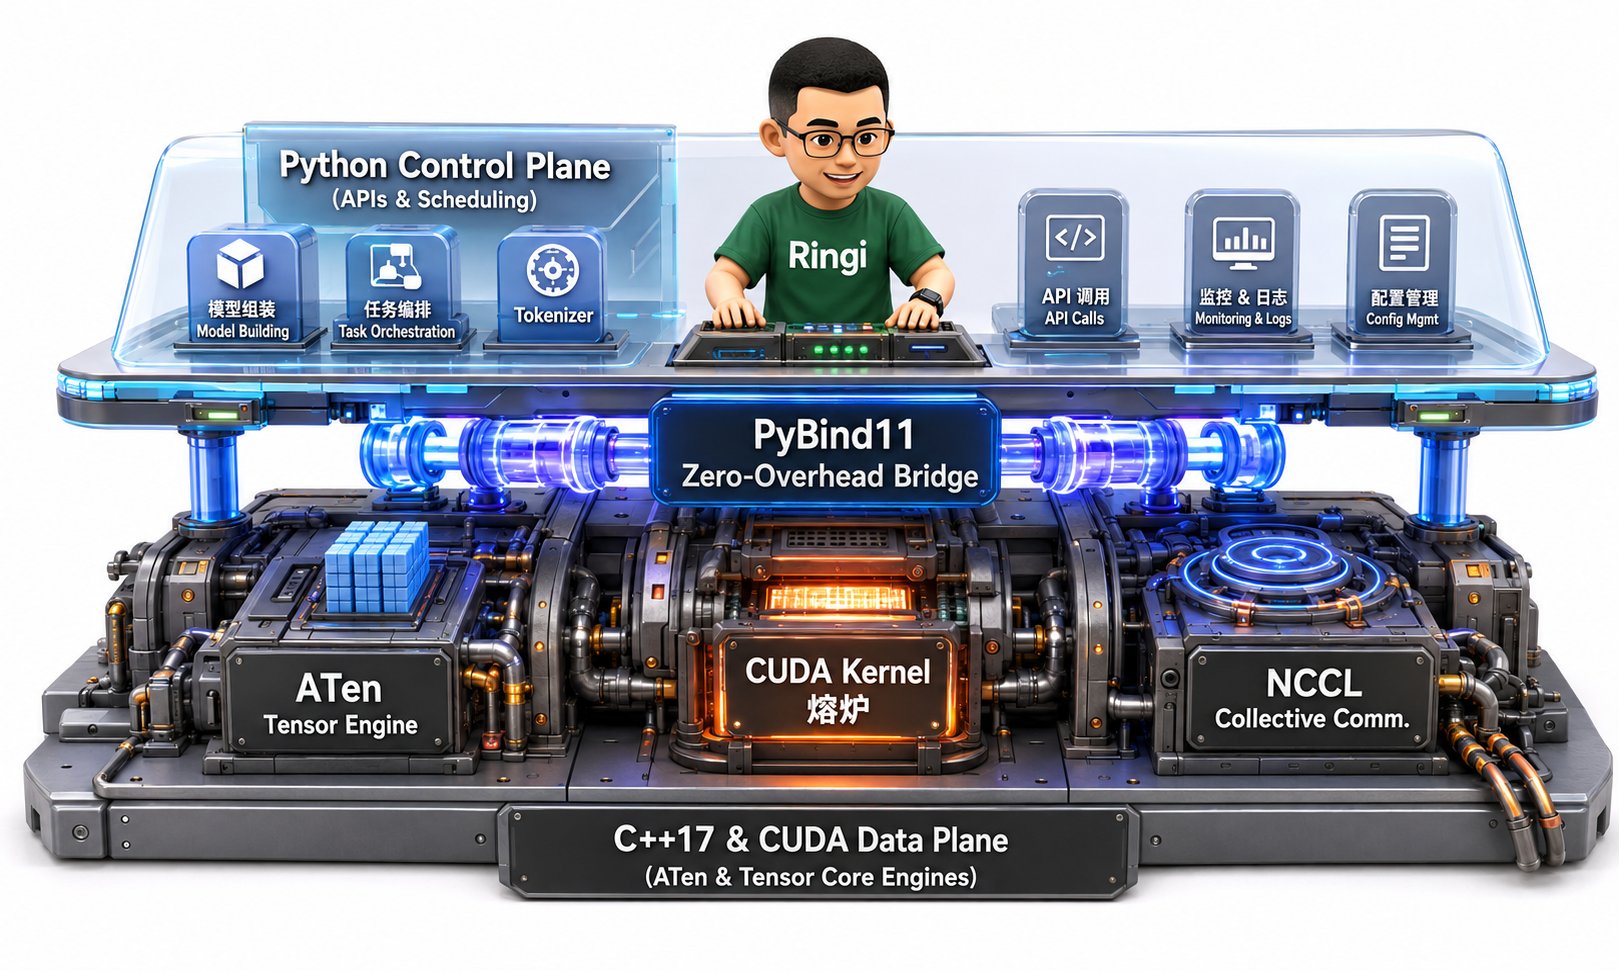 可以把 AI Infra 中常见的语言分工粗略理解为三层:
| 层次 | 常见技术 | 主要职责 |
| - | - | - |
| 编排层 | Python / Shell | 模型定义、实验、训练脚本、任务编排 |
| 系统层 | C / C++ | Tensor 实现、调度、内存管理、通信、Runtime |
| 设备层 | CUDA C++ / Triton | GPU Kernel、访存优化、并行计算、算子融合 |
Python 的最大优点是开发效率高。
C++ 的最大优点是:
* 生命周期可控;
* 内存布局可控;
* 可以直接调用系统 API;
* 可以接入 CUDA / NCCL / Driver;
* 模板可以在编译期生成高性能特化代码;
* 没有 Python 对象模型带来的逐元素动态开销。
因此实际系统一般是:
> **Python 负责“我要做什么”,C++ / CUDA 负责“具体怎么高效做”。**
***
## 0.2 Python 的性能开销到底在哪里?
### 0.2.1 解释器与动态分派
考虑一个纯 Python 循环:
```python theme={null}
def add_python(a: list[float], b: list[float]) -> list[float]:
out = []
for x, y in zip(a, b):
out.append(x + y)
return out
```
这里每一次 `x + y` 都不是简单的一条 CPU 浮点加法指令。
解释器需要处理:
1. Python 对象;
2. 类型检查;
3. 操作符分派;
4. 引用计数;
5. Python list 的对象指针;
6. 动态内存管理。
而连续数组上的 C++ 循环:
```cpp theme={null}
for (std::size_t i = 0; i < n; ++i) {
out[i] = a[i] + b[i];
}
```
编译器可以进一步:
* 内联;
* 自动向量化;
* 展开循环;
* 使用 SIMD;
* 消除不必要的边界检查。
***
## 0.2.2 Python 对象不是“裸数据”
在 C++ 中:
```cpp theme={null}
float x = 1.0f;
```
`x` 可以直接对应内存中的 4 个字节浮点数据。
而 Python:
```python theme={null}
x = 1.0
```
`x` 更准确地说是一个**名字**,绑定到一个 Python 对象。
这个对象除了数值本身,还需要类型、引用计数等运行时元数据。
因此:
```python theme={null}
values = [1.0, 2.0, 3.0]
```
也不是一段紧凑的三个 `float`。
Python `list` 本质上更接近:
```text theme={null}
list
├── pointer ──> Python float object
├── pointer ──> Python float object
└── pointer ──> Python float object
```
而 Tensor / NumPy 数组通常更接近:
```text theme={null}
metadata
│
└── data pointer ──> [float][float][float][float]...
```
这就是为什么 AI 系统如此强调:
* contiguous;
* dtype;
* shape;
* stride;
* storage;
* data pointer;
* zero-copy。
***
## 0.2.3 GIL:要理解,但不要背成一句口号
传统 CPython 默认构建中存在 **GIL(Global Interpreter Lock)**。
这意味着在一个进程中,多个线程通常不能同时执行 Python 字节码。
所以:
```python theme={null}
Thread-1: Python CPU loop
Thread-2: Python CPU loop
```
通常不会因为有两个 CPU Core 就自动获得 2 倍性能。
但是下面这种理解也是错的:
> “有 GIL,所以 Python 线程完全没用。”
实际情况是:
* 阻塞 I/O 期间可以让其他线程运行;
* NumPy / PyTorch 等原生扩展可以把耗时计算放到 C/C++;
* C/C++ 扩展可以在安全条件下释放 GIL;
* GPU Kernel 启动后,实际计算发生在 GPU 上。
另外,从 Python 3.13 开始,CPython 已经提供可选的 free-threaded 构建,可以在特定构建中关闭 GIL。**但不能因此假设生产环境中的所有 Python 都已经没有 GIL**。写扩展时仍然要理解 Python C API、线程状态与 GIL 的边界。
***
## 0.3 什么时候应该下沉到 C++?
不要一看到 Python 就重写成 C++。
推荐优化顺序:
```text theme={null}
算法复杂度
↓
减少无意义的 I/O / 序列化 / 数据复制
↓
批处理 / 向量化
↓
减少 Python ↔ C++ 边界调用次数
↓
Profiler 确认热点
↓
C++ / CUDA / Triton
```
如果一个函数只执行 2 微秒,但你调用它 100 万次,那么真正的问题可能不是 C++ 算得不够快,而是:
> **边界调用太碎。**
AI Infra 中常见的正确优化不是:
```text theme={null}
1000000 次小调用 × 每次快一点
```
而是:
```text theme={null}
1 次批量调用 × 一次处理大量数据
```
***
# 1. 现代 C++(C++11/14/17)核心必备武器库
***
## 1.1 先建立物理直觉:变量、地址、指针与引用
在 64 位 Linux 进程里,每个进程看到的是自己的**虚拟地址空间**。
例如:
```cpp theme={null}
#include
int main() {
int x = 42;
std::cout << "value = " << x << '\n';
std::cout << "address = " << &x << '\n';
return 0;
}
```
可能输出:
```text theme={null}
value = 42
address = 0x7ffd0f23a82c
```
其中:
```cpp theme={null}
&x
```
表示取变量 `x` 的地址。
***
## 1.2 指针:保存地址的变量
```cpp theme={null}
int x = 42;
int* p = &x;
```
此时:
```text theme={null}
x = 42
p
│
└──────> x 所在的内存地址
```
通过:
```cpp theme={null}
*p
```
可以访问该地址上的对象。
```cpp theme={null}
*p = 100;
```
此时:
```cpp theme={null}
std::cout << x; // 100
```
***
## 1.3 引用:已有对象的别名
```cpp theme={null}
int x = 42;
int& ref = x;
ref = 100;
std::cout << x; // 100
```
引用与指针的典型差异可以先这样记:
| 项目 | 指针 | 引用 |
| - | - | - |
| 语法 | `T*` | `T&` |
| 可为空 | 可以 | 正常引用语义下不应为空 |
| 可重新指向 | 可以 | 初始化后绑定同一个对象 |
| 常见语义 | 可选对象、数组地址、底层 API | 非拥有访问、函数参数 |
在 AI Infra 代码中你会经常看到:
```cpp theme={null}
void run(const Tensor& x);
```
意思通常是:
> 我需要访问 `x`,但这个函数不拥有 `x`,也不打算复制 `x` 这个 C++ 句柄。
***
## 1.4 `const T&` 为什么如此常见?
假设:
```cpp theme={null}
struct Config {
std::string model_path;
std::vector devices;
};
```
如果写:
```cpp theme={null}
void launch(Config config);
```
按值传递可能需要构造一个新的 `Config`。
如果只读:
```cpp theme={null}
void launch(const Config& config);
```
通常更合适。
但注意:
> 对 `torch::Tensor` 这种本身就是轻量引用计数句柄的类型,“按值传 Tensor”与“复制整块 Tensor 数据”完全不是一回事。
这是后面理解 `at::Tensor` 的关键。
***
# 1.5 栈、堆与“真正应该关心的东西”:生命周期
初学 C++ 时常听到:
* 栈;
* 堆。
但工程中更重要的问题是:
> **这个对象活多久?谁负责释放?**
例如:
```cpp theme={null}
void bad() {
int* p = new int(42);
}
```
函数结束后,`p` 这个指针变量没了,但 `new int(42)` 分配的内存还在。
没有人再能释放它。
这叫:
```text theme={null}
memory leak
```
再看:
```cpp theme={null}
int* p = new int(42);
delete p;
std::cout << *p;
```
`delete` 后仍然访问:
```cpp theme={null}
*p
```
这就是悬空指针问题。
***
# 1.6 RAII:现代 C++ 最重要的思想之一
**RAII = Resource Acquisition Is Initialization**
不要只把它理解成一句翻译:
> 资源获取即初始化。
真正工程意义是:
> **把资源的生命周期绑定到 C++ 对象生命周期。**
对象进入作用域时拿资源。
对象离开作用域时自动释放资源。
***
## 1.6.1 手工资源管理为什么危险?
```cpp theme={null}
void process() {
FILE* f = fopen("data.bin", "rb");
if (!f) {
return;
}
do_something();
fclose(f);
}
```
如果:
```cpp theme={null}
do_something();
```
中间抛异常,`fclose` 可能永远不会执行。
***
## 1.6.2 RAII 写法
```cpp theme={null}
#include
#include
class File {
public:
explicit File(const char* path)
: handle_(std::fopen(path, "rb")) {
if (handle_ == nullptr) {
throw std::runtime_error("failed to open file");
}
}
~File() {
if (handle_ != nullptr) {
std::fclose(handle_);
}
}
File(const File&) = delete;
File& operator=(const File&) = delete;
private:
std::FILE* handle_;
};
```
调用:
```cpp theme={null}
void process() {
File file("data.bin");
do_something();
}
```
即使 `do_something()` 抛异常,栈展开时 `File::~File()` 仍然执行。
***
## 1.6.3 RAII 在 AI Infra 中管理什么?
可以把 AI Infra 中常见的语言分工粗略理解为三层:
| 层次 | 常见技术 | 主要职责 |
| - | - | - |
| 编排层 | Python / Shell | 模型定义、实验、训练脚本、任务编排 |
| 系统层 | C / C++ | Tensor 实现、调度、内存管理、通信、Runtime |
| 设备层 | CUDA C++ / Triton | GPU Kernel、访存优化、并行计算、算子融合 |
Python 的最大优点是开发效率高。
C++ 的最大优点是:
* 生命周期可控;
* 内存布局可控;
* 可以直接调用系统 API;
* 可以接入 CUDA / NCCL / Driver;
* 模板可以在编译期生成高性能特化代码;
* 没有 Python 对象模型带来的逐元素动态开销。
因此实际系统一般是:
> **Python 负责“我要做什么”,C++ / CUDA 负责“具体怎么高效做”。**
***
## 0.2 Python 的性能开销到底在哪里?
### 0.2.1 解释器与动态分派
考虑一个纯 Python 循环:
```python theme={null}
def add_python(a: list[float], b: list[float]) -> list[float]:
out = []
for x, y in zip(a, b):
out.append(x + y)
return out
```
这里每一次 `x + y` 都不是简单的一条 CPU 浮点加法指令。
解释器需要处理:
1. Python 对象;
2. 类型检查;
3. 操作符分派;
4. 引用计数;
5. Python list 的对象指针;
6. 动态内存管理。
而连续数组上的 C++ 循环:
```cpp theme={null}
for (std::size_t i = 0; i < n; ++i) {
out[i] = a[i] + b[i];
}
```
编译器可以进一步:
* 内联;
* 自动向量化;
* 展开循环;
* 使用 SIMD;
* 消除不必要的边界检查。
***
## 0.2.2 Python 对象不是“裸数据”
在 C++ 中:
```cpp theme={null}
float x = 1.0f;
```
`x` 可以直接对应内存中的 4 个字节浮点数据。
而 Python:
```python theme={null}
x = 1.0
```
`x` 更准确地说是一个**名字**,绑定到一个 Python 对象。
这个对象除了数值本身,还需要类型、引用计数等运行时元数据。
因此:
```python theme={null}
values = [1.0, 2.0, 3.0]
```
也不是一段紧凑的三个 `float`。
Python `list` 本质上更接近:
```text theme={null}
list
├── pointer ──> Python float object
├── pointer ──> Python float object
└── pointer ──> Python float object
```
而 Tensor / NumPy 数组通常更接近:
```text theme={null}
metadata
│
└── data pointer ──> [float][float][float][float]...
```
这就是为什么 AI 系统如此强调:
* contiguous;
* dtype;
* shape;
* stride;
* storage;
* data pointer;
* zero-copy。
***
## 0.2.3 GIL:要理解,但不要背成一句口号
传统 CPython 默认构建中存在 **GIL(Global Interpreter Lock)**。
这意味着在一个进程中,多个线程通常不能同时执行 Python 字节码。
所以:
```python theme={null}
Thread-1: Python CPU loop
Thread-2: Python CPU loop
```
通常不会因为有两个 CPU Core 就自动获得 2 倍性能。
但是下面这种理解也是错的:
> “有 GIL,所以 Python 线程完全没用。”
实际情况是:
* 阻塞 I/O 期间可以让其他线程运行;
* NumPy / PyTorch 等原生扩展可以把耗时计算放到 C/C++;
* C/C++ 扩展可以在安全条件下释放 GIL;
* GPU Kernel 启动后,实际计算发生在 GPU 上。
另外,从 Python 3.13 开始,CPython 已经提供可选的 free-threaded 构建,可以在特定构建中关闭 GIL。**但不能因此假设生产环境中的所有 Python 都已经没有 GIL**。写扩展时仍然要理解 Python C API、线程状态与 GIL 的边界。
***
## 0.3 什么时候应该下沉到 C++?
不要一看到 Python 就重写成 C++。
推荐优化顺序:
```text theme={null}
算法复杂度
↓
减少无意义的 I/O / 序列化 / 数据复制
↓
批处理 / 向量化
↓
减少 Python ↔ C++ 边界调用次数
↓
Profiler 确认热点
↓
C++ / CUDA / Triton
```
如果一个函数只执行 2 微秒,但你调用它 100 万次,那么真正的问题可能不是 C++ 算得不够快,而是:
> **边界调用太碎。**
AI Infra 中常见的正确优化不是:
```text theme={null}
1000000 次小调用 × 每次快一点
```
而是:
```text theme={null}
1 次批量调用 × 一次处理大量数据
```
***
# 1. 现代 C++(C++11/14/17)核心必备武器库
***
## 1.1 先建立物理直觉:变量、地址、指针与引用
在 64 位 Linux 进程里,每个进程看到的是自己的**虚拟地址空间**。
例如:
```cpp theme={null}
#include
int main() {
int x = 42;
std::cout << "value = " << x << '\n';
std::cout << "address = " << &x << '\n';
return 0;
}
```
可能输出:
```text theme={null}
value = 42
address = 0x7ffd0f23a82c
```
其中:
```cpp theme={null}
&x
```
表示取变量 `x` 的地址。
***
## 1.2 指针:保存地址的变量
```cpp theme={null}
int x = 42;
int* p = &x;
```
此时:
```text theme={null}
x = 42
p
│
└──────> x 所在的内存地址
```
通过:
```cpp theme={null}
*p
```
可以访问该地址上的对象。
```cpp theme={null}
*p = 100;
```
此时:
```cpp theme={null}
std::cout << x; // 100
```
***
## 1.3 引用:已有对象的别名
```cpp theme={null}
int x = 42;
int& ref = x;
ref = 100;
std::cout << x; // 100
```
引用与指针的典型差异可以先这样记:
| 项目 | 指针 | 引用 |
| - | - | - |
| 语法 | `T*` | `T&` |
| 可为空 | 可以 | 正常引用语义下不应为空 |
| 可重新指向 | 可以 | 初始化后绑定同一个对象 |
| 常见语义 | 可选对象、数组地址、底层 API | 非拥有访问、函数参数 |
在 AI Infra 代码中你会经常看到:
```cpp theme={null}
void run(const Tensor& x);
```
意思通常是:
> 我需要访问 `x`,但这个函数不拥有 `x`,也不打算复制 `x` 这个 C++ 句柄。
***
## 1.4 `const T&` 为什么如此常见?
假设:
```cpp theme={null}
struct Config {
std::string model_path;
std::vector devices;
};
```
如果写:
```cpp theme={null}
void launch(Config config);
```
按值传递可能需要构造一个新的 `Config`。
如果只读:
```cpp theme={null}
void launch(const Config& config);
```
通常更合适。
但注意:
> 对 `torch::Tensor` 这种本身就是轻量引用计数句柄的类型,“按值传 Tensor”与“复制整块 Tensor 数据”完全不是一回事。
这是后面理解 `at::Tensor` 的关键。
***
# 1.5 栈、堆与“真正应该关心的东西”:生命周期
初学 C++ 时常听到:
* 栈;
* 堆。
但工程中更重要的问题是:
> **这个对象活多久?谁负责释放?**
例如:
```cpp theme={null}
void bad() {
int* p = new int(42);
}
```
函数结束后,`p` 这个指针变量没了,但 `new int(42)` 分配的内存还在。
没有人再能释放它。
这叫:
```text theme={null}
memory leak
```
再看:
```cpp theme={null}
int* p = new int(42);
delete p;
std::cout << *p;
```
`delete` 后仍然访问:
```cpp theme={null}
*p
```
这就是悬空指针问题。
***
# 1.6 RAII:现代 C++ 最重要的思想之一
**RAII = Resource Acquisition Is Initialization**
不要只把它理解成一句翻译:
> 资源获取即初始化。
真正工程意义是:
> **把资源的生命周期绑定到 C++ 对象生命周期。**
对象进入作用域时拿资源。
对象离开作用域时自动释放资源。
***
## 1.6.1 手工资源管理为什么危险?
```cpp theme={null}
void process() {
FILE* f = fopen("data.bin", "rb");
if (!f) {
return;
}
do_something();
fclose(f);
}
```
如果:
```cpp theme={null}
do_something();
```
中间抛异常,`fclose` 可能永远不会执行。
***
## 1.6.2 RAII 写法
```cpp theme={null}
#include
#include
class File {
public:
explicit File(const char* path)
: handle_(std::fopen(path, "rb")) {
if (handle_ == nullptr) {
throw std::runtime_error("failed to open file");
}
}
~File() {
if (handle_ != nullptr) {
std::fclose(handle_);
}
}
File(const File&) = delete;
File& operator=(const File&) = delete;
private:
std::FILE* handle_;
};
```
调用:
```cpp theme={null}
void process() {
File file("data.bin");
do_something();
}
```
即使 `do_something()` 抛异常,栈展开时 `File::~File()` 仍然执行。
***
## 1.6.3 RAII 在 AI Infra 中管理什么?
 不仅是 CPU 内存。
它可以管理:
```text theme={null}
CPU heap memory
file descriptor
socket
mutex
thread
CUDA device memory
CUDA stream
CUDA event
NCCL communicator
temporary workspace
mmap region
```
例如概念上的 CUDA Buffer:
```cpp theme={null}
class CudaBuffer {
public:
explicit CudaBuffer(std::size_t bytes) {
cudaMalloc(&ptr_, bytes);
}
~CudaBuffer() {
if (ptr_ != nullptr) {
cudaFree(ptr_);
}
}
private:
void* ptr_{nullptr};
};
```
这才是“大厂底层代码不喜欢裸 `malloc/free`、裸 `cudaMalloc/cudaFree` 满天飞”的根本原因。
> 严格来说,不是“永远不能手写 malloc/free”,而是**资源所有权必须被封装,异常路径和提前返回路径也必须安全**。
***
# 1.7 智能指针:让所有权写进类型系统
C++ 中最常用:
```cpp theme={null}
std::unique_ptr
std::shared_ptr
std::weak_ptr
```
***
## 1.7.1 `std::unique_ptr`
唯一所有权。
```cpp theme={null}
auto buffer = std::make_unique(1024);
```
语义:
```text theme={null}
buffer 独占拥有 Buffer
```
不能普通复制:
```cpp theme={null}
auto b = buffer; // 编译失败
```
可以移动:
```cpp theme={null}
auto b = std::move(buffer);
```
此后所有权转移给 `b`。
### 推荐原则
> 如果资源不需要共享所有权,优先 `unique_ptr`。
***
## 1.7.2 `std::shared_ptr`
共享所有权。
```cpp theme={null}
auto p1 = std::make_shared(1024);
auto p2 = p1;
```
内部维护引用计数:
```text theme={null}
p1 ─┐
├──> Buffer
p2 ─┘
use_count = 2
```
当最后一个拥有者销毁时,对象才释放。
代价包括:
* 控制块;
* 引用计数;
* 多线程下引用计数通常需要原子操作;
* 循环引用问题。
因此:
> `shared_ptr` 不是“懒得想生命周期时的默认答案”。
***
## 1.7.3 `std::weak_ptr`
用于观察 `shared_ptr` 管理的对象,但不增加强引用计数。
典型用途是打破循环引用。
***
# 1.8 移动语义:`std::move` 到底做了什么?
不仅是 CPU 内存。
它可以管理:
```text theme={null}
CPU heap memory
file descriptor
socket
mutex
thread
CUDA device memory
CUDA stream
CUDA event
NCCL communicator
temporary workspace
mmap region
```
例如概念上的 CUDA Buffer:
```cpp theme={null}
class CudaBuffer {
public:
explicit CudaBuffer(std::size_t bytes) {
cudaMalloc(&ptr_, bytes);
}
~CudaBuffer() {
if (ptr_ != nullptr) {
cudaFree(ptr_);
}
}
private:
void* ptr_{nullptr};
};
```
这才是“大厂底层代码不喜欢裸 `malloc/free`、裸 `cudaMalloc/cudaFree` 满天飞”的根本原因。
> 严格来说,不是“永远不能手写 malloc/free”,而是**资源所有权必须被封装,异常路径和提前返回路径也必须安全**。
***
# 1.7 智能指针:让所有权写进类型系统
C++ 中最常用:
```cpp theme={null}
std::unique_ptr
std::shared_ptr
std::weak_ptr
```
***
## 1.7.1 `std::unique_ptr`
唯一所有权。
```cpp theme={null}
auto buffer = std::make_unique(1024);
```
语义:
```text theme={null}
buffer 独占拥有 Buffer
```
不能普通复制:
```cpp theme={null}
auto b = buffer; // 编译失败
```
可以移动:
```cpp theme={null}
auto b = std::move(buffer);
```
此后所有权转移给 `b`。
### 推荐原则
> 如果资源不需要共享所有权,优先 `unique_ptr`。
***
## 1.7.2 `std::shared_ptr`
共享所有权。
```cpp theme={null}
auto p1 = std::make_shared(1024);
auto p2 = p1;
```
内部维护引用计数:
```text theme={null}
p1 ─┐
├──> Buffer
p2 ─┘
use_count = 2
```
当最后一个拥有者销毁时,对象才释放。
代价包括:
* 控制块;
* 引用计数;
* 多线程下引用计数通常需要原子操作;
* 循环引用问题。
因此:
> `shared_ptr` 不是“懒得想生命周期时的默认答案”。
***
## 1.7.3 `std::weak_ptr`
用于观察 `shared_ptr` 管理的对象,但不增加强引用计数。
典型用途是打破循环引用。
***
# 1.8 移动语义:`std::move` 到底做了什么?
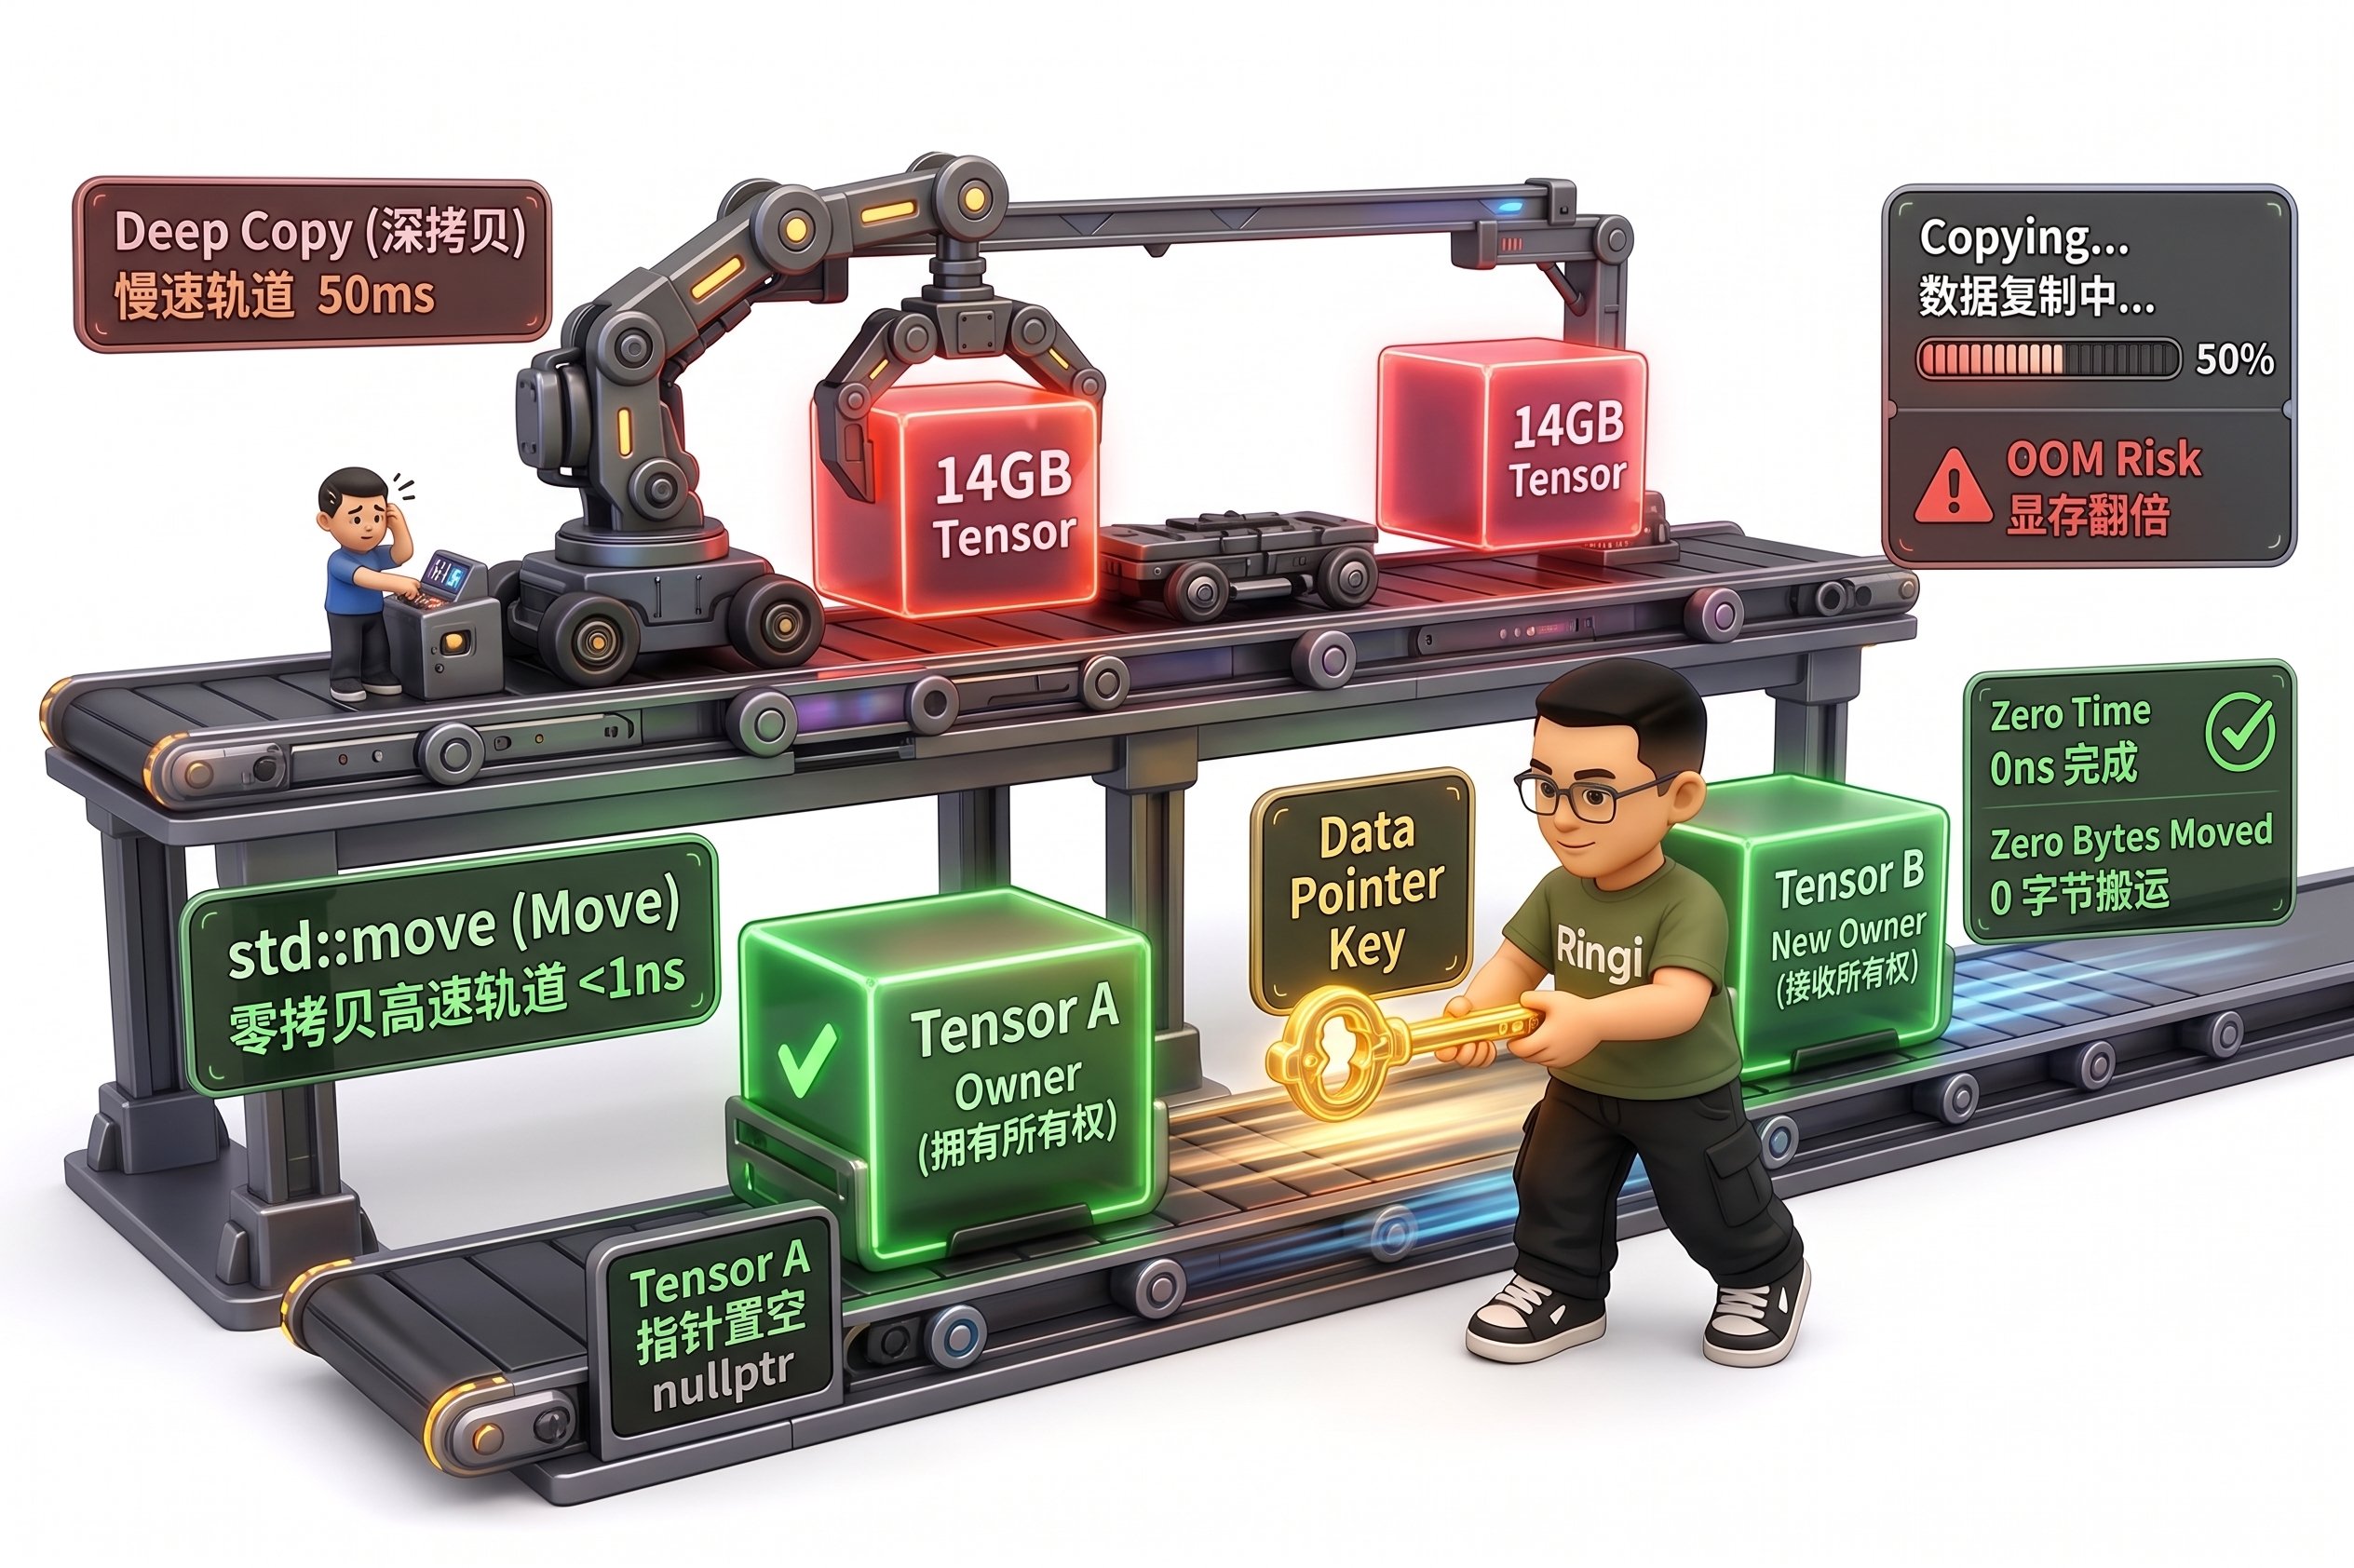 这是面试高频坑点。
先看:
```cpp theme={null}
std::vector a(100000000);
std::vector b = a;
```
这里 `b = a` 是复制。
可能需要重新申请大块内存,然后复制所有元素。
***
## 1.8.1 移动
```cpp theme={null}
std::vector b = std::move(a);
```
对于 `std::vector`,通常可以直接把:
* data pointer;
* size;
* capacity;
转移给 `b`。
概念上:
```text theme={null}
移动前:
a ---> [巨大 Buffer]
移动后:
a ---> empty/valid-but-unspecified
b ---> [原来的巨大 Buffer]
```
真正的数据 Buffer 不需要逐元素复制。
***
## 1.8.2 关键纠正:`std::move` 本身并不“移动任何数据”
`std::move(x)` 本质上是把表达式转换成可以匹配右值引用的形式。
它告诉编译器:
> “如果目标类型支持移动语义,现在可以把这个对象的资源拿走。”
真正执行资源转移的是:
```cpp theme={null}
T(T&&)
```
或者:
```cpp theme={null}
T& operator=(T&&)
```
也就是移动构造 / 移动赋值。
***
## 1.8.3 不要把 `std::move` 神化成“Tensor 零拷贝按钮”
例如 PyTorch 的 `at::Tensor` 本身是一个**引用计数句柄**。
复制:
```cpp theme={null}
at::Tensor b = a;
```
并不等于复制整块 GPU Storage。
很多情况下只是让两个 Tensor 句柄指向同一个底层 `TensorImpl`,并更新引用计数。
所以面试中回答:
> “大 Tensor 一定要 `std::move`,否则会复制几 GB 显存。”
这是不准确的。
正确回答应该是:
> 对拥有大型资源的 C++ 容器或对象,移动语义可以转移所有权,避免深拷贝;但具体收益取决于类型。对 `at::Tensor` 这类引用计数句柄,复制句柄本身并不会复制底层 Tensor Storage。
***
# 1.9 完美转发:`std::forward`
移动语义解决:
> “对象已经是右值时,如何移动?”
完美转发解决:
> “模板函数收到参数后,如何保留调用方原本的左值/右值属性?”
典型写法:
```cpp theme={null}
template
std::unique_ptr make_object(Args&&... args) {
return std::make_unique(
std::forward(args)...
);
}
```
这里的:
```cpp theme={null}
Args&&
```
在模板推导语境中是 forwarding reference。
`std::forward` 会根据原始参数类型决定:
* 继续当左值;
* 还是继续当右值。
***
# 1.10 模板:为什么 AI / CUDA 代码里到处都是 `<T>`?
看一个最简单模板:
```cpp theme={null}
template
T add(T a, T b) {
return a + b;
}
```
调用:
```cpp theme={null}
add(1.0f, 2.0f);
add(1, 2);
```
编译器会针对具体类型实例化代码。
***
## 1.10.1 为什么 Kernel 很适合模板?
AI 中同一个算子可能需要支持:
```text theme={null}
float32
float16
bfloat16
fp8
int8
```
如果每种类型复制一套 Kernel:
```cpp theme={null}
add_float(...)
add_half(...)
add_bfloat16(...)
```
代码会非常重复。
模板可以写成:
```cpp theme={null}
template
void kernel(const scalar_t* x,
const scalar_t* y,
scalar_t* out,
std::size_t n) {
for (std::size_t i = 0; i < n; ++i) {
out[i] = x[i] + y[i];
}
}
```
然后:
```cpp theme={null}
kernel(...);
kernel(...);
```
***
## 1.10.2 模板的性能意义
模板不仅是为了复用代码。
它还允许:
* 编译期特化;
* 常量传播;
* inline;
* 消除动态类型分派;
* 根据 dtype / block size 生成不同 Kernel。
所以你后面读 CUDA 代码时,经常会见到:
```cpp theme={null}
template <
typename T,
int BLOCK_SIZE,
int NUM_WARPS
>
__global__ void kernel(...);
```
***
# 1.11 一个很重要的现代 C++ 原则:Rule of Zero
如果你的类成员本身都是 RAII 类型:
```cpp theme={null}
class ModelBuffer {
private:
std::vector host_;
std::unique_ptr device_;
};
```
一般不需要自己手写:
```cpp theme={null}
~ModelBuffer()
ModelBuffer(const ModelBuffer&)
ModelBuffer(ModelBuffer&&)
operator=
```
让标准库类型自己处理。
这叫:
> **Rule of Zero**
AI Infra 底层代码越复杂,越应该让所有权逻辑尽可能局部、机械、可证明。
***
# 2. Python C 扩展与 PyTorch 桥梁:PyBind11 实战
***
## 2.1 Python 是怎么 `import` C++ 的?
假设 Python:
```python theme={null}
import fastops
```
如果 `fastops` 是 C/C++ 扩展,那么磁盘上实际可能存在:
Linux:
```text theme={null}
fastops.cpython-314-x86_64-linux-gnu.so
```
Windows 常见:
```text theme={null}
fastops.cp314-win_amd64.pyd
```
`.pyd` 本质上也是 Windows DLL 形式的 Python 扩展模块。
Python 导入时大致经历:
```text theme={null}
import fastops
│
▼
Python import system
│
▼
加载动态库 .so / .pyd
│
▼
查找模块初始化入口
│
▼
创建 Python module object
│
▼
注册 C++ 函数
```
PyBind11 的价值就是:
> 帮你把复杂的 Python C API 封装成现代 C++ 接口。
***
# 2.2 PyBind11 最小实战:C++ 向量加法
项目结构:
```text theme={null}
pybind_vector_add/
├── CMakeLists.txt
├── vector_add.cpp
└── test.py
```
***
## 2.2.1 `vector_add.cpp`
```cpp theme={null}
#include
#include
#include
#include
namespace py = pybind11;
std::vector vector_add(
const std::vector& a,
const std::vector& b
) {
if (a.size() != b.size()) {
throw std::invalid_argument(
"a and b must have the same length"
);
}
std::vector out(a.size());
for (std::size_t i = 0; i < a.size(); ++i) {
out[i] = a[i] + b[i];
}
return out;
}
PYBIND11_MODULE(fast_vector, m) {
m.doc() = "Minimal pybind11 vector add example";
m.def(
"vector_add",
&vector_add,
py::arg("a"),
py::arg("b")
);
}
```
***
## 2.2.2 `CMakeLists.txt`
```cmake theme={null}
cmake_minimum_required(VERSION 3.20)
project(fast_vector LANGUAGES CXX)
find_package(
Python
COMPONENTS Interpreter Development
REQUIRED
)
find_package(pybind11 CONFIG REQUIRED)
pybind11_add_module(
fast_vector
vector_add.cpp
)
target_compile_features(
fast_vector
PRIVATE cxx_std_17
)
```
***
## 2.2.3 创建环境
```bash theme={null}
python3 -m venv .venv
source .venv/bin/activate
python -m pip install --upgrade pip
python -m pip install pybind11 cmake ninja
```
***
## 2.2.4 编译
```bash theme={null}
cmake -S . -B build \
-Dpybind11_DIR="$(python -m pybind11 --cmakedir)" \
-DCMAKE_BUILD_TYPE=Release
cmake --build build --parallel
```
***
## 2.2.5 `test.py`
```python theme={null}
from pathlib import Path
import sys
build_dir = Path(__file__).parent / "build"
sys.path.insert(0, str(build_dir))
import fast_vector
a = [1.0, 2.0, 3.0]
b = [10.0, 20.0, 30.0]
out = fast_vector.vector_add(a, b)
print(out)
assert out == [11.0, 22.0, 33.0]
```
运行:
```bash theme={null}
python test.py
```
预期:
```text theme={null}
[11.0, 22.0, 33.0]
```
***
# 2.3 `std::vector` vs Python `list`:一个非常关键的性能陷阱
你可能会看到:
```cpp theme={null}
std::vector vector_add(
const std::vector& a,
const std::vector& b
);
```
然后误以为:
> “这里用了 `const &`,所以 Python list 没复制。”
错。
当你:
```python theme={null}
fast_vector.vector_add([1.0, 2.0], [3.0, 4.0])
```
PyBind11 需要把 Python `list` 转成:
```cpp theme={null}
std::vector
```
这通常意味着:
```text theme={null}
Python list
│
├── 取元素
├── Python float -> C++ float
└── 填进 std::vector
│
▼
C++ function
```
返回时又要:
```text theme={null}
std::vector
│
▼
Python list
```
也就是说:
> `const std::vector<float>&` 只能避免**进入 C++ 函数之后再复制一次这个 vector**,不能消除 Python ↔ C++ 边界转换。
***
# 2.4 真正的 Zero-Copy 应该看什么?
高性能接口应该尽量直接传连续 Buffer。
典型选择:
```text theme={null}
NumPy ndarray
PyTorch Tensor
memoryview / buffer protocol
DLPack
共享内存
```
而不是:
```text theme={null}
Python list of Python float objects
```
***
## 2.4.1 NumPy 思路
PyBind11 支持:
```cpp theme={null}
py::array_t
```
概念上可以直接拿到:
```text theme={null}
shape
stride
data pointer
```
如果数据类型与布局满足要求,就不必先把所有元素转换成一个新的 `std::vector<float>`。
但是 zero-copy 永远有前提:
* dtype 是否匹配;
* contiguous 是否满足;
* alignment 是否满足;
* 谁拥有内存;
* C++ 使用期间 Python 对象是否还活着;
* 是否允许写;
* 生命周期是否跨线程。
所以:
> **Zero-Copy 从来不只是“拿一个裸指针”。它本质上是内存所有权与生命周期协议。**
***
# 2.5 PyBind11 与 GIL
Python 调用 PyBind11 C++ 函数时,PyBind11 默认不会自动把 GIL 放掉。
如果 C++ 函数执行很久,并且整个计算期间:
* 不访问 Python 对象;
* 不调用 Python C API;
* 不回调 Python;
可以考虑释放 GIL。
例如:
```cpp theme={null}
void heavy_compute();
PYBIND11_MODULE(fastops, m) {
m.def(
"heavy_compute",
&heavy_compute,
py::call_guard()
);
}
```
或者:
```cpp theme={null}
m.def("heavy_compute", [] {
py::gil_scoped_release release;
heavy_compute();
});
```
但是:
> 一旦 C++ 代码需要访问 Python 对象,必须重新满足 Python 的线程状态 / GIL 要求。
不要为了“看起来高级”随便释放 GIL。
***
# 2.6 Python ↔ C++ 边界的性能原则
记住四条:
### 原则 1:减少调用次数
差:
```python theme={null}
for i in range(1_000_000):
ext.add_one(x[i])
```
好:
```python theme={null}
ext.add_one_batch(x)
```
***
### 原则 2:避免 Python 容器逐元素转换
差:
```text theme={null}
list[float]
```
好:
```text theme={null}
Tensor / ndarray / buffer
```
***
### 原则 3:清楚生命周期
不要让 C++ 保存一个指向已经释放 Python Buffer 的指针。
***
### 原则 4:C++ 热路径不要频繁回调 Python
否则会重新引入:
* GIL;
* Python frame;
* 类型转换;
* 动态分派。
***
# 3. PyTorch C++ 扩展:从 `torch::Tensor` 到 ATen
***
## 3.1 PyTorch 的 C++ 底座:ATen
你在 Python 中:
```python theme={null}
x = torch.randn(1024, device="cuda")
```
C++ 世界中最核心的 Tensor 类型之一是:
```cpp theme={null}
at::Tensor
```
在扩展中常见:
```cpp theme={null}
torch::Tensor
```
很多使用场景下它们表示同一套 Tensor C++ 抽象。
***
# 3.2 `at::Tensor` 不是“整块数据对象”
这是面试高频坑点。
先看:
```cpp theme={null}
std::vector a(100000000);
std::vector b = a;
```
这里 `b = a` 是复制。
可能需要重新申请大块内存,然后复制所有元素。
***
## 1.8.1 移动
```cpp theme={null}
std::vector b = std::move(a);
```
对于 `std::vector`,通常可以直接把:
* data pointer;
* size;
* capacity;
转移给 `b`。
概念上:
```text theme={null}
移动前:
a ---> [巨大 Buffer]
移动后:
a ---> empty/valid-but-unspecified
b ---> [原来的巨大 Buffer]
```
真正的数据 Buffer 不需要逐元素复制。
***
## 1.8.2 关键纠正:`std::move` 本身并不“移动任何数据”
`std::move(x)` 本质上是把表达式转换成可以匹配右值引用的形式。
它告诉编译器:
> “如果目标类型支持移动语义,现在可以把这个对象的资源拿走。”
真正执行资源转移的是:
```cpp theme={null}
T(T&&)
```
或者:
```cpp theme={null}
T& operator=(T&&)
```
也就是移动构造 / 移动赋值。
***
## 1.8.3 不要把 `std::move` 神化成“Tensor 零拷贝按钮”
例如 PyTorch 的 `at::Tensor` 本身是一个**引用计数句柄**。
复制:
```cpp theme={null}
at::Tensor b = a;
```
并不等于复制整块 GPU Storage。
很多情况下只是让两个 Tensor 句柄指向同一个底层 `TensorImpl`,并更新引用计数。
所以面试中回答:
> “大 Tensor 一定要 `std::move`,否则会复制几 GB 显存。”
这是不准确的。
正确回答应该是:
> 对拥有大型资源的 C++ 容器或对象,移动语义可以转移所有权,避免深拷贝;但具体收益取决于类型。对 `at::Tensor` 这类引用计数句柄,复制句柄本身并不会复制底层 Tensor Storage。
***
# 1.9 完美转发:`std::forward`
移动语义解决:
> “对象已经是右值时,如何移动?”
完美转发解决:
> “模板函数收到参数后,如何保留调用方原本的左值/右值属性?”
典型写法:
```cpp theme={null}
template
std::unique_ptr make_object(Args&&... args) {
return std::make_unique(
std::forward(args)...
);
}
```
这里的:
```cpp theme={null}
Args&&
```
在模板推导语境中是 forwarding reference。
`std::forward` 会根据原始参数类型决定:
* 继续当左值;
* 还是继续当右值。
***
# 1.10 模板:为什么 AI / CUDA 代码里到处都是 `<T>`?
看一个最简单模板:
```cpp theme={null}
template
T add(T a, T b) {
return a + b;
}
```
调用:
```cpp theme={null}
add(1.0f, 2.0f);
add(1, 2);
```
编译器会针对具体类型实例化代码。
***
## 1.10.1 为什么 Kernel 很适合模板?
AI 中同一个算子可能需要支持:
```text theme={null}
float32
float16
bfloat16
fp8
int8
```
如果每种类型复制一套 Kernel:
```cpp theme={null}
add_float(...)
add_half(...)
add_bfloat16(...)
```
代码会非常重复。
模板可以写成:
```cpp theme={null}
template
void kernel(const scalar_t* x,
const scalar_t* y,
scalar_t* out,
std::size_t n) {
for (std::size_t i = 0; i < n; ++i) {
out[i] = x[i] + y[i];
}
}
```
然后:
```cpp theme={null}
kernel(...);
kernel(...);
```
***
## 1.10.2 模板的性能意义
模板不仅是为了复用代码。
它还允许:
* 编译期特化;
* 常量传播;
* inline;
* 消除动态类型分派;
* 根据 dtype / block size 生成不同 Kernel。
所以你后面读 CUDA 代码时,经常会见到:
```cpp theme={null}
template <
typename T,
int BLOCK_SIZE,
int NUM_WARPS
>
__global__ void kernel(...);
```
***
# 1.11 一个很重要的现代 C++ 原则:Rule of Zero
如果你的类成员本身都是 RAII 类型:
```cpp theme={null}
class ModelBuffer {
private:
std::vector host_;
std::unique_ptr device_;
};
```
一般不需要自己手写:
```cpp theme={null}
~ModelBuffer()
ModelBuffer(const ModelBuffer&)
ModelBuffer(ModelBuffer&&)
operator=
```
让标准库类型自己处理。
这叫:
> **Rule of Zero**
AI Infra 底层代码越复杂,越应该让所有权逻辑尽可能局部、机械、可证明。
***
# 2. Python C 扩展与 PyTorch 桥梁:PyBind11 实战
***
## 2.1 Python 是怎么 `import` C++ 的?
假设 Python:
```python theme={null}
import fastops
```
如果 `fastops` 是 C/C++ 扩展,那么磁盘上实际可能存在:
Linux:
```text theme={null}
fastops.cpython-314-x86_64-linux-gnu.so
```
Windows 常见:
```text theme={null}
fastops.cp314-win_amd64.pyd
```
`.pyd` 本质上也是 Windows DLL 形式的 Python 扩展模块。
Python 导入时大致经历:
```text theme={null}
import fastops
│
▼
Python import system
│
▼
加载动态库 .so / .pyd
│
▼
查找模块初始化入口
│
▼
创建 Python module object
│
▼
注册 C++ 函数
```
PyBind11 的价值就是:
> 帮你把复杂的 Python C API 封装成现代 C++ 接口。
***
# 2.2 PyBind11 最小实战:C++ 向量加法
项目结构:
```text theme={null}
pybind_vector_add/
├── CMakeLists.txt
├── vector_add.cpp
└── test.py
```
***
## 2.2.1 `vector_add.cpp`
```cpp theme={null}
#include
#include
#include
#include
namespace py = pybind11;
std::vector vector_add(
const std::vector& a,
const std::vector& b
) {
if (a.size() != b.size()) {
throw std::invalid_argument(
"a and b must have the same length"
);
}
std::vector out(a.size());
for (std::size_t i = 0; i < a.size(); ++i) {
out[i] = a[i] + b[i];
}
return out;
}
PYBIND11_MODULE(fast_vector, m) {
m.doc() = "Minimal pybind11 vector add example";
m.def(
"vector_add",
&vector_add,
py::arg("a"),
py::arg("b")
);
}
```
***
## 2.2.2 `CMakeLists.txt`
```cmake theme={null}
cmake_minimum_required(VERSION 3.20)
project(fast_vector LANGUAGES CXX)
find_package(
Python
COMPONENTS Interpreter Development
REQUIRED
)
find_package(pybind11 CONFIG REQUIRED)
pybind11_add_module(
fast_vector
vector_add.cpp
)
target_compile_features(
fast_vector
PRIVATE cxx_std_17
)
```
***
## 2.2.3 创建环境
```bash theme={null}
python3 -m venv .venv
source .venv/bin/activate
python -m pip install --upgrade pip
python -m pip install pybind11 cmake ninja
```
***
## 2.2.4 编译
```bash theme={null}
cmake -S . -B build \
-Dpybind11_DIR="$(python -m pybind11 --cmakedir)" \
-DCMAKE_BUILD_TYPE=Release
cmake --build build --parallel
```
***
## 2.2.5 `test.py`
```python theme={null}
from pathlib import Path
import sys
build_dir = Path(__file__).parent / "build"
sys.path.insert(0, str(build_dir))
import fast_vector
a = [1.0, 2.0, 3.0]
b = [10.0, 20.0, 30.0]
out = fast_vector.vector_add(a, b)
print(out)
assert out == [11.0, 22.0, 33.0]
```
运行:
```bash theme={null}
python test.py
```
预期:
```text theme={null}
[11.0, 22.0, 33.0]
```
***
# 2.3 `std::vector` vs Python `list`:一个非常关键的性能陷阱
你可能会看到:
```cpp theme={null}
std::vector vector_add(
const std::vector& a,
const std::vector& b
);
```
然后误以为:
> “这里用了 `const &`,所以 Python list 没复制。”
错。
当你:
```python theme={null}
fast_vector.vector_add([1.0, 2.0], [3.0, 4.0])
```
PyBind11 需要把 Python `list` 转成:
```cpp theme={null}
std::vector
```
这通常意味着:
```text theme={null}
Python list
│
├── 取元素
├── Python float -> C++ float
└── 填进 std::vector
│
▼
C++ function
```
返回时又要:
```text theme={null}
std::vector
│
▼
Python list
```
也就是说:
> `const std::vector<float>&` 只能避免**进入 C++ 函数之后再复制一次这个 vector**,不能消除 Python ↔ C++ 边界转换。
***
# 2.4 真正的 Zero-Copy 应该看什么?
高性能接口应该尽量直接传连续 Buffer。
典型选择:
```text theme={null}
NumPy ndarray
PyTorch Tensor
memoryview / buffer protocol
DLPack
共享内存
```
而不是:
```text theme={null}
Python list of Python float objects
```
***
## 2.4.1 NumPy 思路
PyBind11 支持:
```cpp theme={null}
py::array_t
```
概念上可以直接拿到:
```text theme={null}
shape
stride
data pointer
```
如果数据类型与布局满足要求,就不必先把所有元素转换成一个新的 `std::vector<float>`。
但是 zero-copy 永远有前提:
* dtype 是否匹配;
* contiguous 是否满足;
* alignment 是否满足;
* 谁拥有内存;
* C++ 使用期间 Python 对象是否还活着;
* 是否允许写;
* 生命周期是否跨线程。
所以:
> **Zero-Copy 从来不只是“拿一个裸指针”。它本质上是内存所有权与生命周期协议。**
***
# 2.5 PyBind11 与 GIL
Python 调用 PyBind11 C++ 函数时,PyBind11 默认不会自动把 GIL 放掉。
如果 C++ 函数执行很久,并且整个计算期间:
* 不访问 Python 对象;
* 不调用 Python C API;
* 不回调 Python;
可以考虑释放 GIL。
例如:
```cpp theme={null}
void heavy_compute();
PYBIND11_MODULE(fastops, m) {
m.def(
"heavy_compute",
&heavy_compute,
py::call_guard()
);
}
```
或者:
```cpp theme={null}
m.def("heavy_compute", [] {
py::gil_scoped_release release;
heavy_compute();
});
```
但是:
> 一旦 C++ 代码需要访问 Python 对象,必须重新满足 Python 的线程状态 / GIL 要求。
不要为了“看起来高级”随便释放 GIL。
***
# 2.6 Python ↔ C++ 边界的性能原则
记住四条:
### 原则 1:减少调用次数
差:
```python theme={null}
for i in range(1_000_000):
ext.add_one(x[i])
```
好:
```python theme={null}
ext.add_one_batch(x)
```
***
### 原则 2:避免 Python 容器逐元素转换
差:
```text theme={null}
list[float]
```
好:
```text theme={null}
Tensor / ndarray / buffer
```
***
### 原则 3:清楚生命周期
不要让 C++ 保存一个指向已经释放 Python Buffer 的指针。
***
### 原则 4:C++ 热路径不要频繁回调 Python
否则会重新引入:
* GIL;
* Python frame;
* 类型转换;
* 动态分派。
***
# 3. PyTorch C++ 扩展:从 `torch::Tensor` 到 ATen
***
## 3.1 PyTorch 的 C++ 底座:ATen
你在 Python 中:
```python theme={null}
x = torch.randn(1024, device="cuda")
```
C++ 世界中最核心的 Tensor 类型之一是:
```cpp theme={null}
at::Tensor
```
在扩展中常见:
```cpp theme={null}
torch::Tensor
```
很多使用场景下它们表示同一套 Tensor C++ 抽象。
***
# 3.2 `at::Tensor` 不是“整块数据对象”
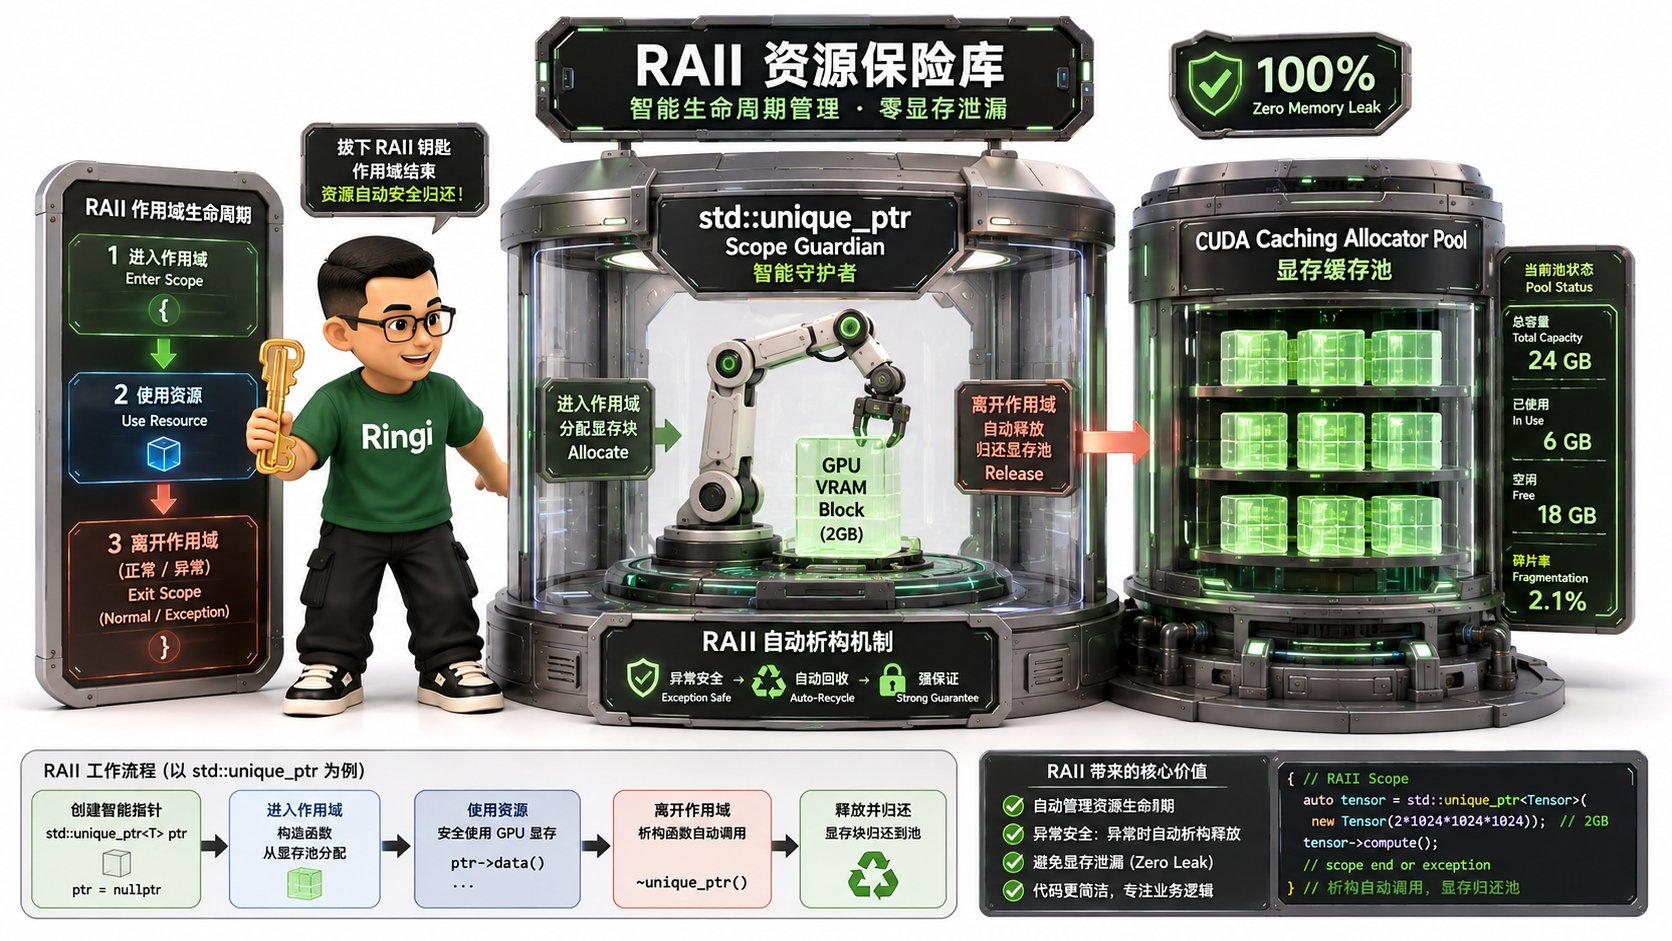 这是非常关键的一层认知。
可以把它粗略理解为:
```text theme={null}
at::Tensor
│
▼
intrusive_ptr
│
├── sizes
├── strides
├── dtype
├── device
├── storage_offset
├── dispatch metadata
│
▼
Storage
│
▼
data pointer
│
▼
CPU RAM / CUDA VRAM / other device memory
```
真正的大块数据一般由 Storage 管理。
Tensor 句柄本身主要管理:
* 对 TensorImpl 的引用;
* shape;
* stride;
* dtype;
* device;
* storage relation;
* dispatch / autograd 等元数据。
因此:
```cpp theme={null}
at::Tensor b = a;
```
一般不是“复制整个 Tensor 数据”。
它更接近:
```text theme={null}
两个 Tensor handle
│
└────> 共享某个底层实现 / Storage
```
***
# 3.3 为什么 Tensor View 可以很便宜?
例如 Python:
```python theme={null}
x = torch.arange(12)
y = x.view(3, 4)
```
`view` 很多时候不复制底层 Storage。
只是产生新的:
```text theme={null}
sizes
strides
storage_offset
```
因此 AI Infra 中必须理解:
> shape 一样,不代表内存布局一样。
例如:
```python theme={null}
x = torch.randn(4, 8)
y = x.transpose(0, 1)
```
`y` 可能不是 contiguous。
如果你的 C++ / CUDA Kernel 假设输入连续,却没有检查 stride,就可能直接算错。
***
# 3.4 最小 PyTorch C++ Extension
我们先做最简单的:
```cpp theme={null}
custom_add(a, b)
```
暂时不写 CUDA Kernel。
***
## 3.4.1 项目结构
```text theme={null}
cpp_extension_demo/
├── op.cpp
└── test_cpp_extension.py
```
***
## 3.4.2 `op.cpp`
```cpp theme={null}
#include
torch::Tensor custom_add(
const torch::Tensor& a,
const torch::Tensor& b
) {
TORCH_CHECK(
a.device() == b.device(),
"a and b must be on the same device"
);
TORCH_CHECK(
a.scalar_type() == b.scalar_type(),
"a and b must have the same dtype"
);
TORCH_CHECK(
a.sizes() == b.sizes(),
"a and b must have the same shape"
);
return a + b;
}
PYBIND11_MODULE(TORCH_EXTENSION_NAME, m) {
m.def(
"custom_add",
&custom_add,
"Custom add implemented with ATen"
);
}
```
这里:
```cpp theme={null}
return a + b;
```
最终会进入 PyTorch/ATen 的算子分发体系。
这个例子还没有自己写 CPU Kernel,它的价值是先打通:
```text theme={null}
Python
↓
PyBind
↓
C++
↓
ATen
↓
PyTorch backend
```
***
# 3.5 用 `torch.utils.cpp_extension.load` JIT 编译
`test_cpp_extension.py`:
```python theme={null}
from pathlib import Path
import torch
from torch.utils.cpp_extension import load
ROOT = Path(__file__).resolve().parent
custom_ops = load(
name="ringi_custom_ops",
sources=[str(ROOT / "op.cpp")],
extra_cflags=["-O3", "-std=c++17"],
verbose=True,
)
def main() -> None:
a = torch.tensor([1.0, 2.0, 3.0])
b = torch.tensor([10.0, 20.0, 30.0])
actual = custom_ops.custom_add(a, b)
expected = a + b
print("actual :", actual)
print("expected:", expected)
torch.testing.assert_close(actual, expected)
print("PASS")
if __name__ == "__main__":
main()
```
运行:
```bash theme={null}
python test_cpp_extension.py
```
第一次运行会触发编译。
后续如果源码与编译条件未变化,构建缓存可以避免每次从零开始。
***
# 3.6 JIT `load()` 在背后做了什么?
简化来看:
```text theme={null}
Python
│
│ torch.utils.cpp_extension.load(...)
▼
生成构建文件
│
▼
调用 C++ compiler / Ninja
│
▼
编译 op.cpp
│
▼
链接 libtorch / Python 扩展依赖
│
▼
生成动态库
│
▼
加载到当前 Python 进程
│
▼
返回 Python module
```
这就是为什么 C++ Extension 出错时,你经常会同时看到:
```text theme={null}
Python error
compiler error
linker error
dynamic loader error
ABI error
```
它不是单纯的“Python 包”。
***
# 3.7 `torch.utils.cpp_extension.load` 常见参数
```python theme={null}
load(
name="my_ext",
sources=["op.cpp"],
extra_cflags=["-O3"],
verbose=True,
)
```
重要参数:
| 参数 | 含义 |
| - | - |
| `name` | 扩展模块名 |
| `sources` | C++ / CUDA 源文件 |
| `extra_cflags` | 传给 C++ 编译器 |
| `extra_cuda_cflags` | 传给 NVCC |
| `extra_ldflags` | 额外链接参数 |
| `build_directory` | 指定构建目录 |
| `verbose` | 显示详细构建日志 |
如果源码包含:
```text theme={null}
kernel.cu
```
PyTorch 的扩展构建系统可以检测 CUDA 源文件并调用对应工具链。
***
# 3.8 AOT:不要每次启动程序都现场编译
教学阶段:
```python theme={null}
load(...)
```
非常方便。
生产环境更常见的是:
```text theme={null}
源码
↓
构建 wheel / extension
↓
安装
↓
import
```
例如可以使用:
```python theme={null}
from setuptools import setup
from torch.utils.cpp_extension import (
BuildExtension,
CppExtension,
)
setup(
name="ringi_custom_ops",
ext_modules=[
CppExtension(
name="ringi_custom_ops",
sources=["op.cpp"],
extra_compile_args=["-O3"],
)
],
cmdclass={
"build_ext": BuildExtension
},
)
```
然后构建 wheel。
这样部署环境就不必在每次进程启动时重新编译。
***
# 3.9 更正式的 PyTorch Custom Operator:Dispatcher 注册
上面的 PyBind 例子很好理解。
但如果你希望自定义算子更完整地参与:
```text theme={null}
torch.compile
Autograd
FakeTensor / Meta
export
vmap
Dispatcher
CPU/CUDA backend dispatch
```
那么更正式的方向是注册 PyTorch Custom Operator。
C++ 侧常见:
```cpp theme={null}
TORCH_LIBRARY(ringi, m) {
m.def("custom_add(Tensor a, Tensor b) -> Tensor");
}
```
并为具体 DispatchKey 注册实现。
概念上:
```text theme={null}
operator schema
│
▼
PyTorch Dispatcher
│
├── CPU implementation
├── CUDA implementation
├── Autograd
├── Meta/Fake
└── other backends
```
这才是理解 PyTorch “一个算子为什么能在 CPU/CUDA/Autograd/Compile 中工作”的核心入口。
***
# 3.10 自定义 C++ 算子如何保持 Autograd 可导?
这是面试高频题。
要分情况回答。
***
## 情况 A:C++ 函数内部只组合已有 ATen 可导算子
例如:
```cpp theme={null}
return a * b + 1;
```
如果这些调用走 PyTorch 正常的 Autograd/Dispatcher 路径,已有算子的梯度规则可以继续构图。
此时你不是发明了一个新的数学原语,而是在 C++ 中组合已有算子。
***
## 情况 B:你自己写了一个“黑盒” CPU/CUDA Kernel
例如:
```text theme={null}
my_fused_attention_kernel<<<...>>>()
```
PyTorch 不可能凭空知道:
```text theme={null}
dy/dx
```
是什么。
这时就需要为你的 Operator 注册 backward / autograd formula。
现代 PyTorch Custom Operator 路线中,可以通过相应的 `torch.library` / C++ Dispatcher 注册机制补齐 Autograd。
并且应该使用:
```python theme={null}
torch.library.opcheck(...)
```
等工具检查注册契约。
***
# 3.11 `torch.autograd.Function` 和 Custom Operator 是一回事吗?
不是。
`torch.autograd.Function` 是自定义前向/反向的一种机制。
但一个完整的 PyTorch Operator 还可能需要兼容:
* Dispatcher;
* `torch.compile`;
* export;
* vmap;
* FakeTensor;
* device dispatch;
* schema;
* alias / mutation contract。
所以工程中不要只会说:
> “自定义算子 = 写一个 `torch.autograd.Function`。”
现在更应该理解完整的 Operator 注册体系。
***
# 4. 动手实战:从 0 跑通一个 C++ Extension
这一节直接给出最小可运行包。
***
## 4.1 环境要求
建议:
```text theme={null}
Linux
Python 3.10+
PyTorch
C++17 compiler
Ninja
```
检查:
```bash theme={null}
python --version
python -c "import torch; print(torch.__version__)"
c++ --version
ninja --version
```
***
# 4.2 项目结构
```text theme={null}
cpp_extension_demo/
├── op.cpp
└── test_cpp_extension.py
```
***
# 4.3 `op.cpp`
```cpp theme={null}
#include
torch::Tensor custom_add(
const torch::Tensor& a,
const torch::Tensor& b
) {
TORCH_CHECK(
a.defined() && b.defined(),
"inputs must be defined tensors"
);
TORCH_CHECK(
a.device() == b.device(),
"device mismatch: ",
a.device(),
" vs ",
b.device()
);
TORCH_CHECK(
a.scalar_type() == b.scalar_type(),
"dtype mismatch: ",
a.scalar_type(),
" vs ",
b.scalar_type()
);
TORCH_CHECK(
a.sizes() == b.sizes(),
"shape mismatch: ",
a.sizes(),
" vs ",
b.sizes()
);
return a + b;
}
PYBIND11_MODULE(TORCH_EXTENSION_NAME, m) {
m.def(
"custom_add",
&custom_add,
"Ringi custom add"
);
}
```
***
# 4.4 `test_cpp_extension.py`
```python theme={null}
from pathlib import Path
import torch
from torch.utils.cpp_extension import load
ROOT = Path(__file__).resolve().parent
ext = load(
name="ringi_custom_add_ext",
sources=[
str(ROOT / "op.cpp"),
],
extra_cflags=[
"-O3",
"-std=c++17",
],
verbose=True,
)
def check_forward() -> None:
torch.manual_seed(42)
a = torch.randn(1024, dtype=torch.float32)
b = torch.randn(1024, dtype=torch.float32)
actual = ext.custom_add(a, b)
expected = torch.add(a, b)
torch.testing.assert_close(
actual,
expected,
rtol=0,
atol=0,
)
print("[PASS] forward")
def check_autograd() -> None:
a = torch.randn(
16,
dtype=torch.float64,
requires_grad=True,
)
b = torch.randn(
16,
dtype=torch.float64,
requires_grad=True,
)
out = ext.custom_add(a, b)
loss = out.sum()
loss.backward()
torch.testing.assert_close(
a.grad,
torch.ones_like(a),
)
torch.testing.assert_close(
b.grad,
torch.ones_like(b),
)
print("[PASS] autograd")
def check_error() -> None:
a = torch.randn(4)
b = torch.randn(5)
try:
ext.custom_add(a, b)
except RuntimeError as exc:
print("[PASS] error path:", exc)
else:
raise AssertionError(
"shape mismatch should fail"
)
def main() -> None:
print("torch version:", torch.__version__)
check_forward()
check_autograd()
check_error()
print("ALL TESTS PASSED")
if __name__ == "__main__":
main()
```
***
# 4.5 运行
```bash theme={null}
python test_cpp_extension.py
```
你应该至少看到:
```text theme={null}
[PASS] forward
[PASS] autograd
[PASS] error path: ...
ALL TESTS PASSED
```
***
# 4.6 为什么这个例子能测 Autograd?
因为:
```cpp theme={null}
return a + b;
```
最终使用的是 PyTorch 已有的加法算子。
也就是说你的 C++ 函数只是:
```text theme={null}
Python
↓
C++ wrapper
↓
已有 PyTorch add operator
```
而不是一个 Autograd 完全不知道的自定义黑盒 Kernel。
***
# 4.7 如何证明没有把 Tensor 数据复制到 Python list?
我们传入的是:
```python theme={null}
torch.Tensor
```
不是:
```python theme={null}
list[float]
```
PyTorch 的 Python Tensor 与 C++ Tensor 之间有专门的桥接与生命周期管理。
C++ 收到的不是“把每个元素重新做成一个 `std::vector<float>`”。
这正是为什么高性能框架都围绕 Tensor / Buffer 抽象设计。
***
# 4.8 如果下一步改成 CUDA 会发生什么?
项目会变成:
```text theme={null}
cpp_extension_demo/
├── binding.cpp
├── kernel.cu
└── test.py
```
调用链:
```text theme={null}
Python
↓
binding.cpp
↓
CUDA launcher
↓
kernel<<>>()
↓
GPU
```
你还需要继续理解:
* device;
* current CUDA stream;
* async launch;
* synchronization;
* kernel error;
* dtype dispatch;
* contiguous;
* alignment;
* shared memory;
* warp;
* occupancy;
* memory coalescing。
这就是下一阶段真正进入 AI Infra CUDA 世界的入口。
***
# 5. Ringi 避坑指南
***
## 5.1 ❌ 返回局部对象引用
错误:
```cpp theme={null}
const std::string& bad() {
std::string x = "hello";
return x;
}
```
函数结束时:
```cpp theme={null}
x
```
已经销毁。
返回引用指向已经不存在的对象。
这是典型:
```text theme={null}
dangling reference
```
***
## 5.2 ❌ 返回局部变量指针
错误:
```cpp theme={null}
int* bad() {
int x = 42;
return &x;
}
```
函数退出后地址失效。
***
## 5.3 ❌ 以为裸指针等于 Zero-Copy
```cpp theme={null}
float* ptr;
```
只告诉你:
> 某个地址上可能有 float。
它没有告诉你:
* 内存是不是还活着;
* 谁负责释放;
* 长度是多少;
* 在 CPU 还是 GPU;
* contiguous 吗;
* 谁拥有它;
* 什么时候能释放;
* 是否正在被异步 Kernel 使用。
所以:
> **裸指针只是地址,不是完整的数据协议。**
***
## 5.4 ❌ `shared_ptr` 到处用
如果所有东西都是:
```cpp theme={null}
std::shared_ptr
```
最后你会发现:
* 谁真正拥有资源不清楚;
* 生命周期变长;
* 循环引用;
* 引用计数有成本;
* 释放时机不可预测。
默认先想:
```text theme={null}
谁是唯一 owner?
```
***
## 5.5 ❌ 以为 `std::move` 后对象“不能用了”
标准 C++ 更准确的说法是:
> moved-from object 仍然必须处于有效但通常未指定的状态。
例如:
```cpp theme={null}
std::vector a{1, 2, 3};
auto b = std::move(a);
```
你可以安全地:
```cpp theme={null}
a.clear();
a.push_back(4);
```
但不要假设:
```cpp theme={null}
a == {1, 2, 3}
```
***
## 5.6 ❌ 对函数返回值乱加 `std::move`
例如:
```cpp theme={null}
std::vector make_buffer() {
std::vector out(1024);
return std::move(out);
}
```
现代 C++ 中通常直接:
```cpp theme={null}
return out;
```
更好。
编译器可以使用:
```text theme={null}
RVO / NRVO
```
消除复制。
乱写 `std::move` 反而可能妨碍优化。
***
## 5.7 ❌ C++ 算子里频繁调用 Python API
例如:
```text theme={null}
C++ inner loop
↓
Python callback
↓
C++
↓
Python callback
```
这会引入:
* GIL;
* Python object;
* callback;
* 边界转换;
* 解释器开销。
性能敏感路径应该尽量:
```text theme={null}
一次进入 C++
↓
批量完成
↓
一次返回
```
***
## 5.8 ❌ 忽略 Tensor dtype
错误:
```cpp theme={null}
float* ptr = tensor.data_ptr();
```
如果传入:
```text theme={null}
float16
bfloat16
float64
```
怎么办?
所以真实 Kernel 一般必须检查:
```cpp theme={null}
tensor.scalar_type()
```
或者做 dtype dispatch。
***
## 5.9 ❌ 忽略 device
你拿到:
```cpp theme={null}
torch::Tensor x
```
必须搞清楚:
```text theme={null}
CPU?
CUDA?
XPU?
other backend?
```
不要把 CUDA Tensor 的地址当 CPU 地址直接解引用。
***
## 5.10 ❌ 忽略 contiguous / stride
错误思维:
```text theme={null}
shape = [1024, 1024]
所以内存一定连续
```
不一定。
例如 transpose 产生的 Tensor 可能共享原 Storage,但 stride 已改变。
真实 Kernel 必须:
* 支持 arbitrary stride;
* 或明确要求 contiguous;
* 或内部调用 `.contiguous()`。
但要注意:
```cpp theme={null}
auto x2 = x.contiguous();
```
如果输入本来不连续,这可能发生真实数据复制。
所以“为了方便全部 `.contiguous()`”也可能成为性能问题。
***
## 5.11 ❌ 忽略 GPU 异步执行
CUDA Kernel launch 通常是异步的。
CPU 发起:
```text theme={null}
kernel launch
```
不代表 GPU 已经算完。
所以测性能时如果直接:
```python theme={null}
start = time.time()
op()
end = time.time()
```
可能只测到了 launch 开销。
GPU benchmark 通常需要:
```python theme={null}
torch.cuda.synchronize()
```
或者使用 CUDA Event / `torch.utils.benchmark` 等合适工具。
***
## 5.12 ❌ 一出编译错误就重装 CUDA
C++ Extension 出错可能发生在:
```text theme={null}
Python
C++ compiler
libstdc++
PyTorch headers
ABI
linker
CUDA Toolkit
NVCC
driver
dynamic loader
```
先定位层次,不要先重装全世界。
***
# 6. 大厂面试高频题
***
## 面试题 1:`std::unique_ptr` 与 `std::shared_ptr` 区别?
推荐回答:
`unique_ptr` 表示唯一所有权,不可复制但可以移动,额外成本很低,应该作为默认拥有型指针。`shared_ptr` 表示共享所有权,通过控制块和引用计数管理生命周期,适合确实存在多个 owner 的对象,但有额外计数成本,并要注意循环引用;循环引用通常使用 `weak_ptr` 打破。
***
## 面试题 2:RAII 为什么对 CUDA 显存管理重要?
推荐回答:
CUDA 内存属于资源,可能遇到异常、提前返回、多分支路径。如果直接在业务代码中手工 `cudaMalloc/cudaFree`,容易遗漏释放或重复释放。RAII 把 `cudaFree` 放到析构函数中,让资源生命周期与 C++ 对象作用域绑定,可以显著降低泄漏和错误释放风险。Stream、Event、NCCL communicator 也可以使用同样的设计。
***
## 面试题 3:`std::move` 为什么能提高大对象传递性能?
不要回答:
> “`std::move` 会自动做零拷贝。”
更好的回答:
`std::move` 只是把表达式转换成右值形式,使类型可以选择移动构造或移动赋值。如果类型拥有 heap buffer,例如 `std::vector`,移动通常可以转移内部指针和容量,从而避免逐元素深拷贝。具体收益取决于类型;对 `at::Tensor` 这样的引用计数句柄,普通复制句柄本身也不会复制整个 Tensor Storage。
***
## 面试题 4:Python list 传到 `const std::vector<float>&` 是 Zero-Copy 吗?
不是。
PyBind11 的 STL 自动转换通常需要把 Python list 的元素转换到一个 C++ `std::vector` 中。
`const &` 只能避免 C++ 函数内部再次复制这个 vector。
高性能接口应该优先考虑:
```text theme={null}
NumPy ndarray
PyTorch Tensor
buffer protocol
DLPack
```
***
## 面试题 5:为什么 PyTorch Tensor 复制句柄很便宜?
因为 `at::Tensor` 更接近引用计数 handle。
多个 Tensor 对象可以指向同一个 TensorImpl / Storage。
例如:
```cpp theme={null}
at::Tensor b = a;
```
通常只会产生新的句柄引用关系,而不是复制整块显存。
真正复制数据一般是:
```python theme={null}
x.clone()
```
或其他明确需要新 Storage 的操作。
***
## 面试题 6:PyTorch Tensor 的 shape 与 stride 分别是什么?
`shape/sizes` 描述每个维度长度。
`stride` 描述沿某个维度移动一个元素时,在底层 Storage 中需要跨多少个元素。
因此 transpose 可以只修改 stride,而不复制 Storage。
这也是为什么自定义 Kernel 不能只看 shape。
***
## 面试题 7:PyTorch 自定义 C++ 算子怎样支持 Autograd?
要分两类:
1. 如果 C++ 中只是组合已有 PyTorch/ATen 可导算子,Autograd 可以沿已有算子继续记录;
2. 如果注册了自己的黑盒 CPU/CUDA Kernel,就必须为该 Operator 提供正确的 Autograd/backward 注册,并验证梯度与 Operator schema 契约。
***
## 面试题 8:为什么 C++ 扩展可能比 Python 还慢?
常见原因:
* 每次调用计算量太小;
* Python ↔ C++ 边界开销占主导;
* list / vector 来回转换;
* 不必要 memcpy;
* 线程创建;
* cache miss;
* 没向量化;
* `.contiguous()` 发生复制;
* GPU Kernel 太小;
* 强制同步;
* 编译参数没优化;
* 算法复杂度没变。
所以:
> C++ 不是性能魔法,性能工程必须 measurement-driven。
***
## 面试题 9:什么时候释放 GIL?
当 C/C++ 扩展进入一个较长的原生计算区间,并且该区间:
* 不访问 Python 对象;
* 不调用 Python C API;
* 不需要 Python callback;
可以释放 GIL,让其他 Python 线程继续运行。
如果需要再次调用 Python,就必须正确恢复线程状态 / GIL 约束。
***
## 面试题 10:为什么不能返回局部对象引用?
局部对象离开作用域后生命周期结束。
返回其引用或地址会产生:
```text theme={null}
dangling reference / dangling pointer
```
后续访问属于未定义行为。
***
# 7. Debug:C++ Extension 出错怎么定位?
建立固定排查顺序。
***
## 7.1 第一步:确认 Python 与 PyTorch
```bash theme={null}
which python
python --version
python - <<'PY'
import torch
print(torch.__version__)
print(torch.__file__)
print(torch.version.cuda)
print(torch.cuda.is_available())
PY
```
***
## 7.2 第二步:确认编译器
```bash theme={null}
which c++
c++ --version
```
***
## 7.3 第三步:确认 Ninja
```bash theme={null}
ninja --version
```
***
## 7.4 第四步:如果包含 CUDA,确认工具链
```bash theme={null}
nvidia-smi
nvcc --version
```
注意:
```text theme={null}
nvidia-smi 显示的 CUDA compatibility
```
与:
```text theme={null}
本机 nvcc Toolkit 版本
```
不是同一个概念。
***
## 7.5 第五步:看完整编译命令
使用:
```python theme={null}
load(
...,
verbose=True,
)
```
不要只复制最后一行:
```text theme={null}
Error: build failed
```
真正有价值的是前面第一条 compiler error。
***
## 7.6 第六步:区分 compile / link / import
### 编译错误
典型:
```text theme={null}
error: no matching function
error: undeclared identifier
```
属于源码 / C++ API 层。
### 链接错误
典型:
```text theme={null}
undefined reference
```
属于符号 / library / ABI / link flags 层。
### import 错误
典型:
```text theme={null}
undefined symbol
cannot open shared object file
```
属于动态加载 / ABI / runtime library 层。
***
# 8. 性能工程视角:这节课真正要建立的思维
***
## 8.1 从“值”升级到“Buffer”
初学编程看:
```text theme={null}
变量的值是多少?
```
AI Infra 要继续问:
```text theme={null}
这个值在哪个 Buffer?
Buffer 在 CPU 还是 GPU?
地址是什么?
stride 是什么?
谁拥有它?
什么时候释放?
是否需要 copy?
哪个 Stream 正在使用?
```
***
## 8.2 从“函数”升级到“边界”
看到:
```python theme={null}
y = custom_op(x)
```
不要只想:
> custom\_op 做了什么数学运算?
还要问:
```text theme={null}
Python → C++ 有没有转换?
C++ → CUDA 有没有 memcpy?
有没有 device sync?
有没有 GIL?
有没有创建临时 Tensor?
有没有 contiguous copy?
有没有 allocator 开销?
```
***
## 8.3 从“代码正确”升级到“生命周期正确”
一个 C++ 函数即使数学公式对,也可能因为:
* use-after-free;
* data race;
* dangling pointer;
* double free;
* async lifetime;
* stream ordering;
而完全不可用。
这也是 C++ 对 AI Infra 工程师的重要性。
***
# 9. 本讲自测 Checklist
学完这一讲,你应该能回答:
* [ ] Python 为什么适合做编排,但不适合承担所有性能敏感路径?
* [ ] GIL 限制的究竟是什么?
* [ ] 指针和引用的核心区别是什么?
* [ ] 什么是对象生命周期?
* [ ] RAII 为什么比“记得 free”更可靠?
* [ ] `unique_ptr` 和 `shared_ptr` 如何选择?
* [ ] `std::move` 本身是否真的移动数据?
* [ ] 什么叫 moved-from valid but unspecified state?
* [ ] 为什么模板适合 dtype dispatch?
* [ ] Python `list` 转 `std::vector` 为什么通常不是 Zero-Copy?
* [ ] PyBind11 在跨语言调用里解决了什么?
* [ ] 什么情况下可以释放 GIL?
* [ ] `at::Tensor` 为什么不是整块 Tensor 数据本身?
* [ ] Storage / TensorImpl / Tensor handle 大致是什么关系?
* [ ] shape 和 stride 为什么必须同时理解?
* [ ] `torch.utils.cpp_extension.load` 做了什么?
* [ ] JIT 与 AOT Extension 有什么区别?
* [ ] 为什么自定义 CUDA Kernel 需要额外处理 Autograd?
* [ ] C++ Extension 报错时如何区分 compile / link / import?
* [ ] 为什么“用 C++ 重写”不一定自动变快?
***
# 10. 课后练习
***
## 练习 1:修改 C++ Add
把:
```cpp theme={null}
return a + b;
```
修改成:
```cpp theme={null}
return a * 2 + b;
```
然后在 Python 中验证结果。
***
## 练习 2:增加 dtype 检查
只允许:
```text theme={null}
float32
```
其他 dtype 抛出:
```cpp theme={null}
TORCH_CHECK(...)
```
***
## 练习 3:测试非 contiguous Tensor
Python:
```python theme={null}
x = torch.randn(4, 8)
y = x.transpose(0, 1)
print(y.is_contiguous())
print(y.stride())
```
观察你的 C++ 算子是否仍然正确。
***
## 练习 4:观察 Tensor 共享
Python:
```python theme={null}
x = torch.arange(10)
y = x.view(2, 5)
print(x.data_ptr())
print(y.data_ptr())
```
理解:
```text theme={null}
不同 Tensor view
可以共享底层 Storage
```
***
## 练习 5:比较 list 与 Tensor 边界
分别实现:
```text theme={null}
PyBind11: list -> vector -> list
PyTorch: Tensor -> Tensor
```
输入 100 万个 float,测量两种接口。
重点不要只看 C++ 循环时间,还要看:
```text theme={null}
boundary conversion
```
***
## 练习 6:实现 RAII Buffer
实现:
```cpp theme={null}
class Buffer
```
要求:
* 构造时申请内存;
* 析构时释放;
* 禁止复制;
* 支持移动;
* 可以查询 size。
***
# 11. Ringi 总结
这一讲最重要的不是:
```text theme={null}
记住多少 C++ 关键字
```
而是建立六个意识。
***
## 第一:所有权意识
任何资源都要问:
```text theme={null}
Who owns it?
```
***
## 第二:生命周期意识
任何指针都要问:
```text theme={null}
How long does it live?
```
***
## 第三:数据布局意识
任何 Tensor 都要问:
```text theme={null}
dtype?
shape?
stride?
device?
contiguous?
storage?
```
***
## 第四:边界意识
任何 Python/C++ 调用都要问:
```text theme={null}
有没有类型转换?
有没有 copy?
有没有 GIL?
调用次数多不多?
```
***
## 第五:异步意识
任何 GPU 操作都要问:
```text theme={null}
在哪个 Stream?
什么时候真正完成?
什么时候才能释放?
```
***
## 第六:测量意识
任何性能优化都要先问:
```text theme={null}
瓶颈真的在这里吗?
```
***
你最终要形成这样的思维链:
```text theme={null}
Python API
↓
Python object / Tensor wrapper
↓
C++ binding
↓
ATen / Dispatcher
↓
TensorImpl / Storage
↓
CPU / CUDA implementation
↓
Runtime / Driver
↓
Hardware
```
能够顺着这条链一路往下追,你才真正迈进了 AI Infra 的门。
***
# 12. 下一讲承接
下一讲建议进入:
> **第02讲:GPU 执行模型与 CUDA C++ 入门——Thread / Block / Grid / Warp / Memory Hierarchy**
这一讲学到的:
* 指针;
* RAII;
* 模板;
* Tensor Storage;
* C++ Extension;
都会在 CUDA 中直接复用。
下一讲会继续回答:
```text theme={null}
一个 Tensor 的 data_ptr
到底如何被成千上万个 GPU Thread 并行处理?
```
以及:
```text theme={null}
为什么写对一个 CUDA Kernel 很容易,
写快一个 CUDA Kernel 却非常难?
```
***
# 附录 A:最小代码包
## A.1 `op.cpp`
```cpp theme={null}
#include
torch::Tensor custom_add(
const torch::Tensor& a,
const torch::Tensor& b
) {
TORCH_CHECK(
a.device() == b.device(),
"device mismatch"
);
TORCH_CHECK(
a.scalar_type() == b.scalar_type(),
"dtype mismatch"
);
TORCH_CHECK(
a.sizes() == b.sizes(),
"shape mismatch"
);
return a + b;
}
PYBIND11_MODULE(TORCH_EXTENSION_NAME, m) {
m.def(
"custom_add",
&custom_add,
"Ringi custom add"
);
}
```
## A.2 `test_cpp_extension.py`
```python theme={null}
from pathlib import Path
import torch
from torch.utils.cpp_extension import load
ROOT = Path(__file__).resolve().parent
ext = load(
name="ringi_custom_add_ext",
sources=[str(ROOT / "op.cpp")],
extra_cflags=["-O3", "-std=c++17"],
verbose=True,
)
a = torch.randn(
1024,
dtype=torch.float64,
requires_grad=True,
)
b = torch.randn(
1024,
dtype=torch.float64,
requires_grad=True,
)
actual = ext.custom_add(a, b)
expected = a + b
torch.testing.assert_close(
actual,
expected,
)
loss = actual.sum()
loss.backward()
torch.testing.assert_close(
a.grad,
torch.ones_like(a),
)
torch.testing.assert_close(
b.grad,
torch.ones_like(b),
)
print("ALL TESTS PASSED")
```
***
# 附录 B:参考资料
> 本文基于课程大纲重新组织与原创撰写,并参考以下项目/官方文档用于知识校验与延伸阅读。
1. AIInfraGuide:编程语言基础\
[https://github.com/caomaolufei/AIInfraGuide/blob/main/docs/guides/%E6%A8%A1%E5%9D%97%E4%B8%80-%E5%89%8D%E7%BD%AE%E7%9F%A5%E8%AF%86/%E7%AC%AC1%E7%AB%A0-%E7%BC%96%E7%A8%8B%E8%AF%AD%E8%A8%80%E5%9F%BA%E7%A1%80.md](https://github.com/caomaolufei/AIInfraGuide/blob/main/docs/guides/%E6%A8%A1%E5%9D%97%E4%B8%80-%E5%89%8D%E7%BD%AE%E7%9F%A5%E8%AF%86/%E7%AC%AC1%E7%AB%A0-%E7%BC%96%E7%A8%8B%E8%AF%AD%E8%A8%80%E5%9F%BA%E7%A1%80.md)
2. lilinji / DevopsBooklet:Python 实例手册增强完善版\
[https://github.com/lilinji/DevopsBooklet/blob/master/Python%E5%AE%9E%E4%BE%8B%E6%89%8B%E5%86%8C\_%E5%A2%9E%E5%BC%BA%E5%AE%8C%E5%96%84%E7%89%88.md](https://github.com/lilinji/DevopsBooklet/blob/master/Python%E5%AE%9E%E4%BE%8B%E6%89%8B%E5%86%8C_%E5%A2%9E%E5%BC%BA%E5%AE%8C%E5%96%84%E7%89%88.md)
3. PyTorch Documentation:Custom C++ and CUDA Operators\
[https://docs.pytorch.org/tutorials/advanced/cpp\_custom\_ops.html](https://docs.pytorch.org/tutorials/advanced/cpp_custom_ops.html)
4. PyTorch Documentation:`torch.utils.cpp_extension`\
[https://docs.pytorch.org/docs/stable/cpp\_extension.html](https://docs.pytorch.org/docs/stable/cpp_extension.html)
5. PyTorch Documentation:Extending PyTorch\
[https://docs.pytorch.org/docs/stable/notes/extending.html](https://docs.pytorch.org/docs/stable/notes/extending.html)
6. PyTorch Documentation:`torch.library`\
[https://docs.pytorch.org/docs/stable/library.html](https://docs.pytorch.org/docs/stable/library.html)
7. PyBind11 Documentation:STL Containers\
[https://pybind11.readthedocs.io/en/stable/advanced/cast/stl.html](https://pybind11.readthedocs.io/en/stable/advanced/cast/stl.html)
8. PyBind11 Documentation:Global Interpreter Lock\
[https://pybind11.readthedocs.io/en/stable/advanced/misc.html](https://pybind11.readthedocs.io/en/stable/advanced/misc.html)
9. CPython Documentation:Free-threaded Python\
[https://docs.python.org/3/howto/free-threading-python.html](https://docs.python.org/3/howto/free-threading-python.html)
10. PyTorch Source:ATen `TensorBase` / `TensorImpl`\
[https://github.com/pytorch/pytorch/blob/main/aten/src/ATen/core/TensorBase.h](https://github.com/pytorch/pytorch/blob/main/aten/src/ATen/core/TensorBase.h)\
[https://github.com/pytorch/pytorch/blob/main/c10/core/TensorImpl.h](https://github.com/pytorch/pytorch/blob/main/c10/core/TensorImpl.h)
***
> **Ringi 的一句话复盘:**\
> Python 让你快速调用 AI 系统;C++ 让你真正看见这个系统如何管理内存、调度算子、连接 GPU,并最终解释“为什么它快、为什么它慢、为什么它挂”。
This documentation is built and hosted on [Mintlify](https://mintlify.com), a developer documentation platform.
这是非常关键的一层认知。
可以把它粗略理解为:
```text theme={null}
at::Tensor
│
▼
intrusive_ptr
│
├── sizes
├── strides
├── dtype
├── device
├── storage_offset
├── dispatch metadata
│
▼
Storage
│
▼
data pointer
│
▼
CPU RAM / CUDA VRAM / other device memory
```
真正的大块数据一般由 Storage 管理。
Tensor 句柄本身主要管理:
* 对 TensorImpl 的引用;
* shape;
* stride;
* dtype;
* device;
* storage relation;
* dispatch / autograd 等元数据。
因此:
```cpp theme={null}
at::Tensor b = a;
```
一般不是“复制整个 Tensor 数据”。
它更接近:
```text theme={null}
两个 Tensor handle
│
└────> 共享某个底层实现 / Storage
```
***
# 3.3 为什么 Tensor View 可以很便宜?
例如 Python:
```python theme={null}
x = torch.arange(12)
y = x.view(3, 4)
```
`view` 很多时候不复制底层 Storage。
只是产生新的:
```text theme={null}
sizes
strides
storage_offset
```
因此 AI Infra 中必须理解:
> shape 一样,不代表内存布局一样。
例如:
```python theme={null}
x = torch.randn(4, 8)
y = x.transpose(0, 1)
```
`y` 可能不是 contiguous。
如果你的 C++ / CUDA Kernel 假设输入连续,却没有检查 stride,就可能直接算错。
***
# 3.4 最小 PyTorch C++ Extension
我们先做最简单的:
```cpp theme={null}
custom_add(a, b)
```
暂时不写 CUDA Kernel。
***
## 3.4.1 项目结构
```text theme={null}
cpp_extension_demo/
├── op.cpp
└── test_cpp_extension.py
```
***
## 3.4.2 `op.cpp`
```cpp theme={null}
#include
torch::Tensor custom_add(
const torch::Tensor& a,
const torch::Tensor& b
) {
TORCH_CHECK(
a.device() == b.device(),
"a and b must be on the same device"
);
TORCH_CHECK(
a.scalar_type() == b.scalar_type(),
"a and b must have the same dtype"
);
TORCH_CHECK(
a.sizes() == b.sizes(),
"a and b must have the same shape"
);
return a + b;
}
PYBIND11_MODULE(TORCH_EXTENSION_NAME, m) {
m.def(
"custom_add",
&custom_add,
"Custom add implemented with ATen"
);
}
```
这里:
```cpp theme={null}
return a + b;
```
最终会进入 PyTorch/ATen 的算子分发体系。
这个例子还没有自己写 CPU Kernel,它的价值是先打通:
```text theme={null}
Python
↓
PyBind
↓
C++
↓
ATen
↓
PyTorch backend
```
***
# 3.5 用 `torch.utils.cpp_extension.load` JIT 编译
`test_cpp_extension.py`:
```python theme={null}
from pathlib import Path
import torch
from torch.utils.cpp_extension import load
ROOT = Path(__file__).resolve().parent
custom_ops = load(
name="ringi_custom_ops",
sources=[str(ROOT / "op.cpp")],
extra_cflags=["-O3", "-std=c++17"],
verbose=True,
)
def main() -> None:
a = torch.tensor([1.0, 2.0, 3.0])
b = torch.tensor([10.0, 20.0, 30.0])
actual = custom_ops.custom_add(a, b)
expected = a + b
print("actual :", actual)
print("expected:", expected)
torch.testing.assert_close(actual, expected)
print("PASS")
if __name__ == "__main__":
main()
```
运行:
```bash theme={null}
python test_cpp_extension.py
```
第一次运行会触发编译。
后续如果源码与编译条件未变化,构建缓存可以避免每次从零开始。
***
# 3.6 JIT `load()` 在背后做了什么?
简化来看:
```text theme={null}
Python
│
│ torch.utils.cpp_extension.load(...)
▼
生成构建文件
│
▼
调用 C++ compiler / Ninja
│
▼
编译 op.cpp
│
▼
链接 libtorch / Python 扩展依赖
│
▼
生成动态库
│
▼
加载到当前 Python 进程
│
▼
返回 Python module
```
这就是为什么 C++ Extension 出错时,你经常会同时看到:
```text theme={null}
Python error
compiler error
linker error
dynamic loader error
ABI error
```
它不是单纯的“Python 包”。
***
# 3.7 `torch.utils.cpp_extension.load` 常见参数
```python theme={null}
load(
name="my_ext",
sources=["op.cpp"],
extra_cflags=["-O3"],
verbose=True,
)
```
重要参数:
| 参数 | 含义 |
| - | - |
| `name` | 扩展模块名 |
| `sources` | C++ / CUDA 源文件 |
| `extra_cflags` | 传给 C++ 编译器 |
| `extra_cuda_cflags` | 传给 NVCC |
| `extra_ldflags` | 额外链接参数 |
| `build_directory` | 指定构建目录 |
| `verbose` | 显示详细构建日志 |
如果源码包含:
```text theme={null}
kernel.cu
```
PyTorch 的扩展构建系统可以检测 CUDA 源文件并调用对应工具链。
***
# 3.8 AOT:不要每次启动程序都现场编译
教学阶段:
```python theme={null}
load(...)
```
非常方便。
生产环境更常见的是:
```text theme={null}
源码
↓
构建 wheel / extension
↓
安装
↓
import
```
例如可以使用:
```python theme={null}
from setuptools import setup
from torch.utils.cpp_extension import (
BuildExtension,
CppExtension,
)
setup(
name="ringi_custom_ops",
ext_modules=[
CppExtension(
name="ringi_custom_ops",
sources=["op.cpp"],
extra_compile_args=["-O3"],
)
],
cmdclass={
"build_ext": BuildExtension
},
)
```
然后构建 wheel。
这样部署环境就不必在每次进程启动时重新编译。
***
# 3.9 更正式的 PyTorch Custom Operator:Dispatcher 注册
上面的 PyBind 例子很好理解。
但如果你希望自定义算子更完整地参与:
```text theme={null}
torch.compile
Autograd
FakeTensor / Meta
export
vmap
Dispatcher
CPU/CUDA backend dispatch
```
那么更正式的方向是注册 PyTorch Custom Operator。
C++ 侧常见:
```cpp theme={null}
TORCH_LIBRARY(ringi, m) {
m.def("custom_add(Tensor a, Tensor b) -> Tensor");
}
```
并为具体 DispatchKey 注册实现。
概念上:
```text theme={null}
operator schema
│
▼
PyTorch Dispatcher
│
├── CPU implementation
├── CUDA implementation
├── Autograd
├── Meta/Fake
└── other backends
```
这才是理解 PyTorch “一个算子为什么能在 CPU/CUDA/Autograd/Compile 中工作”的核心入口。
***
# 3.10 自定义 C++ 算子如何保持 Autograd 可导?
这是面试高频题。
要分情况回答。
***
## 情况 A:C++ 函数内部只组合已有 ATen 可导算子
例如:
```cpp theme={null}
return a * b + 1;
```
如果这些调用走 PyTorch 正常的 Autograd/Dispatcher 路径,已有算子的梯度规则可以继续构图。
此时你不是发明了一个新的数学原语,而是在 C++ 中组合已有算子。
***
## 情况 B:你自己写了一个“黑盒” CPU/CUDA Kernel
例如:
```text theme={null}
my_fused_attention_kernel<<<...>>>()
```
PyTorch 不可能凭空知道:
```text theme={null}
dy/dx
```
是什么。
这时就需要为你的 Operator 注册 backward / autograd formula。
现代 PyTorch Custom Operator 路线中,可以通过相应的 `torch.library` / C++ Dispatcher 注册机制补齐 Autograd。
并且应该使用:
```python theme={null}
torch.library.opcheck(...)
```
等工具检查注册契约。
***
# 3.11 `torch.autograd.Function` 和 Custom Operator 是一回事吗?
不是。
`torch.autograd.Function` 是自定义前向/反向的一种机制。
但一个完整的 PyTorch Operator 还可能需要兼容:
* Dispatcher;
* `torch.compile`;
* export;
* vmap;
* FakeTensor;
* device dispatch;
* schema;
* alias / mutation contract。
所以工程中不要只会说:
> “自定义算子 = 写一个 `torch.autograd.Function`。”
现在更应该理解完整的 Operator 注册体系。
***
# 4. 动手实战:从 0 跑通一个 C++ Extension
这一节直接给出最小可运行包。
***
## 4.1 环境要求
建议:
```text theme={null}
Linux
Python 3.10+
PyTorch
C++17 compiler
Ninja
```
检查:
```bash theme={null}
python --version
python -c "import torch; print(torch.__version__)"
c++ --version
ninja --version
```
***
# 4.2 项目结构
```text theme={null}
cpp_extension_demo/
├── op.cpp
└── test_cpp_extension.py
```
***
# 4.3 `op.cpp`
```cpp theme={null}
#include
torch::Tensor custom_add(
const torch::Tensor& a,
const torch::Tensor& b
) {
TORCH_CHECK(
a.defined() && b.defined(),
"inputs must be defined tensors"
);
TORCH_CHECK(
a.device() == b.device(),
"device mismatch: ",
a.device(),
" vs ",
b.device()
);
TORCH_CHECK(
a.scalar_type() == b.scalar_type(),
"dtype mismatch: ",
a.scalar_type(),
" vs ",
b.scalar_type()
);
TORCH_CHECK(
a.sizes() == b.sizes(),
"shape mismatch: ",
a.sizes(),
" vs ",
b.sizes()
);
return a + b;
}
PYBIND11_MODULE(TORCH_EXTENSION_NAME, m) {
m.def(
"custom_add",
&custom_add,
"Ringi custom add"
);
}
```
***
# 4.4 `test_cpp_extension.py`
```python theme={null}
from pathlib import Path
import torch
from torch.utils.cpp_extension import load
ROOT = Path(__file__).resolve().parent
ext = load(
name="ringi_custom_add_ext",
sources=[
str(ROOT / "op.cpp"),
],
extra_cflags=[
"-O3",
"-std=c++17",
],
verbose=True,
)
def check_forward() -> None:
torch.manual_seed(42)
a = torch.randn(1024, dtype=torch.float32)
b = torch.randn(1024, dtype=torch.float32)
actual = ext.custom_add(a, b)
expected = torch.add(a, b)
torch.testing.assert_close(
actual,
expected,
rtol=0,
atol=0,
)
print("[PASS] forward")
def check_autograd() -> None:
a = torch.randn(
16,
dtype=torch.float64,
requires_grad=True,
)
b = torch.randn(
16,
dtype=torch.float64,
requires_grad=True,
)
out = ext.custom_add(a, b)
loss = out.sum()
loss.backward()
torch.testing.assert_close(
a.grad,
torch.ones_like(a),
)
torch.testing.assert_close(
b.grad,
torch.ones_like(b),
)
print("[PASS] autograd")
def check_error() -> None:
a = torch.randn(4)
b = torch.randn(5)
try:
ext.custom_add(a, b)
except RuntimeError as exc:
print("[PASS] error path:", exc)
else:
raise AssertionError(
"shape mismatch should fail"
)
def main() -> None:
print("torch version:", torch.__version__)
check_forward()
check_autograd()
check_error()
print("ALL TESTS PASSED")
if __name__ == "__main__":
main()
```
***
# 4.5 运行
```bash theme={null}
python test_cpp_extension.py
```
你应该至少看到:
```text theme={null}
[PASS] forward
[PASS] autograd
[PASS] error path: ...
ALL TESTS PASSED
```
***
# 4.6 为什么这个例子能测 Autograd?
因为:
```cpp theme={null}
return a + b;
```
最终使用的是 PyTorch 已有的加法算子。
也就是说你的 C++ 函数只是:
```text theme={null}
Python
↓
C++ wrapper
↓
已有 PyTorch add operator
```
而不是一个 Autograd 完全不知道的自定义黑盒 Kernel。
***
# 4.7 如何证明没有把 Tensor 数据复制到 Python list?
我们传入的是:
```python theme={null}
torch.Tensor
```
不是:
```python theme={null}
list[float]
```
PyTorch 的 Python Tensor 与 C++ Tensor 之间有专门的桥接与生命周期管理。
C++ 收到的不是“把每个元素重新做成一个 `std::vector<float>`”。
这正是为什么高性能框架都围绕 Tensor / Buffer 抽象设计。
***
# 4.8 如果下一步改成 CUDA 会发生什么?
项目会变成:
```text theme={null}
cpp_extension_demo/
├── binding.cpp
├── kernel.cu
└── test.py
```
调用链:
```text theme={null}
Python
↓
binding.cpp
↓
CUDA launcher
↓
kernel<<>>()
↓
GPU
```
你还需要继续理解:
* device;
* current CUDA stream;
* async launch;
* synchronization;
* kernel error;
* dtype dispatch;
* contiguous;
* alignment;
* shared memory;
* warp;
* occupancy;
* memory coalescing。
这就是下一阶段真正进入 AI Infra CUDA 世界的入口。
***
# 5. Ringi 避坑指南
***
## 5.1 ❌ 返回局部对象引用
错误:
```cpp theme={null}
const std::string& bad() {
std::string x = "hello";
return x;
}
```
函数结束时:
```cpp theme={null}
x
```
已经销毁。
返回引用指向已经不存在的对象。
这是典型:
```text theme={null}
dangling reference
```
***
## 5.2 ❌ 返回局部变量指针
错误:
```cpp theme={null}
int* bad() {
int x = 42;
return &x;
}
```
函数退出后地址失效。
***
## 5.3 ❌ 以为裸指针等于 Zero-Copy
```cpp theme={null}
float* ptr;
```
只告诉你:
> 某个地址上可能有 float。
它没有告诉你:
* 内存是不是还活着;
* 谁负责释放;
* 长度是多少;
* 在 CPU 还是 GPU;
* contiguous 吗;
* 谁拥有它;
* 什么时候能释放;
* 是否正在被异步 Kernel 使用。
所以:
> **裸指针只是地址,不是完整的数据协议。**
***
## 5.4 ❌ `shared_ptr` 到处用
如果所有东西都是:
```cpp theme={null}
std::shared_ptr
```
最后你会发现:
* 谁真正拥有资源不清楚;
* 生命周期变长;
* 循环引用;
* 引用计数有成本;
* 释放时机不可预测。
默认先想:
```text theme={null}
谁是唯一 owner?
```
***
## 5.5 ❌ 以为 `std::move` 后对象“不能用了”
标准 C++ 更准确的说法是:
> moved-from object 仍然必须处于有效但通常未指定的状态。
例如:
```cpp theme={null}
std::vector a{1, 2, 3};
auto b = std::move(a);
```
你可以安全地:
```cpp theme={null}
a.clear();
a.push_back(4);
```
但不要假设:
```cpp theme={null}
a == {1, 2, 3}
```
***
## 5.6 ❌ 对函数返回值乱加 `std::move`
例如:
```cpp theme={null}
std::vector make_buffer() {
std::vector out(1024);
return std::move(out);
}
```
现代 C++ 中通常直接:
```cpp theme={null}
return out;
```
更好。
编译器可以使用:
```text theme={null}
RVO / NRVO
```
消除复制。
乱写 `std::move` 反而可能妨碍优化。
***
## 5.7 ❌ C++ 算子里频繁调用 Python API
例如:
```text theme={null}
C++ inner loop
↓
Python callback
↓
C++
↓
Python callback
```
这会引入:
* GIL;
* Python object;
* callback;
* 边界转换;
* 解释器开销。
性能敏感路径应该尽量:
```text theme={null}
一次进入 C++
↓
批量完成
↓
一次返回
```
***
## 5.8 ❌ 忽略 Tensor dtype
错误:
```cpp theme={null}
float* ptr = tensor.data_ptr();
```
如果传入:
```text theme={null}
float16
bfloat16
float64
```
怎么办?
所以真实 Kernel 一般必须检查:
```cpp theme={null}
tensor.scalar_type()
```
或者做 dtype dispatch。
***
## 5.9 ❌ 忽略 device
你拿到:
```cpp theme={null}
torch::Tensor x
```
必须搞清楚:
```text theme={null}
CPU?
CUDA?
XPU?
other backend?
```
不要把 CUDA Tensor 的地址当 CPU 地址直接解引用。
***
## 5.10 ❌ 忽略 contiguous / stride
错误思维:
```text theme={null}
shape = [1024, 1024]
所以内存一定连续
```
不一定。
例如 transpose 产生的 Tensor 可能共享原 Storage,但 stride 已改变。
真实 Kernel 必须:
* 支持 arbitrary stride;
* 或明确要求 contiguous;
* 或内部调用 `.contiguous()`。
但要注意:
```cpp theme={null}
auto x2 = x.contiguous();
```
如果输入本来不连续,这可能发生真实数据复制。
所以“为了方便全部 `.contiguous()`”也可能成为性能问题。
***
## 5.11 ❌ 忽略 GPU 异步执行
CUDA Kernel launch 通常是异步的。
CPU 发起:
```text theme={null}
kernel launch
```
不代表 GPU 已经算完。
所以测性能时如果直接:
```python theme={null}
start = time.time()
op()
end = time.time()
```
可能只测到了 launch 开销。
GPU benchmark 通常需要:
```python theme={null}
torch.cuda.synchronize()
```
或者使用 CUDA Event / `torch.utils.benchmark` 等合适工具。
***
## 5.12 ❌ 一出编译错误就重装 CUDA
C++ Extension 出错可能发生在:
```text theme={null}
Python
C++ compiler
libstdc++
PyTorch headers
ABI
linker
CUDA Toolkit
NVCC
driver
dynamic loader
```
先定位层次,不要先重装全世界。
***
# 6. 大厂面试高频题
***
## 面试题 1:`std::unique_ptr` 与 `std::shared_ptr` 区别?
推荐回答:
`unique_ptr` 表示唯一所有权,不可复制但可以移动,额外成本很低,应该作为默认拥有型指针。`shared_ptr` 表示共享所有权,通过控制块和引用计数管理生命周期,适合确实存在多个 owner 的对象,但有额外计数成本,并要注意循环引用;循环引用通常使用 `weak_ptr` 打破。
***
## 面试题 2:RAII 为什么对 CUDA 显存管理重要?
推荐回答:
CUDA 内存属于资源,可能遇到异常、提前返回、多分支路径。如果直接在业务代码中手工 `cudaMalloc/cudaFree`,容易遗漏释放或重复释放。RAII 把 `cudaFree` 放到析构函数中,让资源生命周期与 C++ 对象作用域绑定,可以显著降低泄漏和错误释放风险。Stream、Event、NCCL communicator 也可以使用同样的设计。
***
## 面试题 3:`std::move` 为什么能提高大对象传递性能?
不要回答:
> “`std::move` 会自动做零拷贝。”
更好的回答:
`std::move` 只是把表达式转换成右值形式,使类型可以选择移动构造或移动赋值。如果类型拥有 heap buffer,例如 `std::vector`,移动通常可以转移内部指针和容量,从而避免逐元素深拷贝。具体收益取决于类型;对 `at::Tensor` 这样的引用计数句柄,普通复制句柄本身也不会复制整个 Tensor Storage。
***
## 面试题 4:Python list 传到 `const std::vector<float>&` 是 Zero-Copy 吗?
不是。
PyBind11 的 STL 自动转换通常需要把 Python list 的元素转换到一个 C++ `std::vector` 中。
`const &` 只能避免 C++ 函数内部再次复制这个 vector。
高性能接口应该优先考虑:
```text theme={null}
NumPy ndarray
PyTorch Tensor
buffer protocol
DLPack
```
***
## 面试题 5:为什么 PyTorch Tensor 复制句柄很便宜?
因为 `at::Tensor` 更接近引用计数 handle。
多个 Tensor 对象可以指向同一个 TensorImpl / Storage。
例如:
```cpp theme={null}
at::Tensor b = a;
```
通常只会产生新的句柄引用关系,而不是复制整块显存。
真正复制数据一般是:
```python theme={null}
x.clone()
```
或其他明确需要新 Storage 的操作。
***
## 面试题 6:PyTorch Tensor 的 shape 与 stride 分别是什么?
`shape/sizes` 描述每个维度长度。
`stride` 描述沿某个维度移动一个元素时,在底层 Storage 中需要跨多少个元素。
因此 transpose 可以只修改 stride,而不复制 Storage。
这也是为什么自定义 Kernel 不能只看 shape。
***
## 面试题 7:PyTorch 自定义 C++ 算子怎样支持 Autograd?
要分两类:
1. 如果 C++ 中只是组合已有 PyTorch/ATen 可导算子,Autograd 可以沿已有算子继续记录;
2. 如果注册了自己的黑盒 CPU/CUDA Kernel,就必须为该 Operator 提供正确的 Autograd/backward 注册,并验证梯度与 Operator schema 契约。
***
## 面试题 8:为什么 C++ 扩展可能比 Python 还慢?
常见原因:
* 每次调用计算量太小;
* Python ↔ C++ 边界开销占主导;
* list / vector 来回转换;
* 不必要 memcpy;
* 线程创建;
* cache miss;
* 没向量化;
* `.contiguous()` 发生复制;
* GPU Kernel 太小;
* 强制同步;
* 编译参数没优化;
* 算法复杂度没变。
所以:
> C++ 不是性能魔法,性能工程必须 measurement-driven。
***
## 面试题 9:什么时候释放 GIL?
当 C/C++ 扩展进入一个较长的原生计算区间,并且该区间:
* 不访问 Python 对象;
* 不调用 Python C API;
* 不需要 Python callback;
可以释放 GIL,让其他 Python 线程继续运行。
如果需要再次调用 Python,就必须正确恢复线程状态 / GIL 约束。
***
## 面试题 10:为什么不能返回局部对象引用?
局部对象离开作用域后生命周期结束。
返回其引用或地址会产生:
```text theme={null}
dangling reference / dangling pointer
```
后续访问属于未定义行为。
***
# 7. Debug:C++ Extension 出错怎么定位?
建立固定排查顺序。
***
## 7.1 第一步:确认 Python 与 PyTorch
```bash theme={null}
which python
python --version
python - <<'PY'
import torch
print(torch.__version__)
print(torch.__file__)
print(torch.version.cuda)
print(torch.cuda.is_available())
PY
```
***
## 7.2 第二步:确认编译器
```bash theme={null}
which c++
c++ --version
```
***
## 7.3 第三步:确认 Ninja
```bash theme={null}
ninja --version
```
***
## 7.4 第四步:如果包含 CUDA,确认工具链
```bash theme={null}
nvidia-smi
nvcc --version
```
注意:
```text theme={null}
nvidia-smi 显示的 CUDA compatibility
```
与:
```text theme={null}
本机 nvcc Toolkit 版本
```
不是同一个概念。
***
## 7.5 第五步:看完整编译命令
使用:
```python theme={null}
load(
...,
verbose=True,
)
```
不要只复制最后一行:
```text theme={null}
Error: build failed
```
真正有价值的是前面第一条 compiler error。
***
## 7.6 第六步:区分 compile / link / import
### 编译错误
典型:
```text theme={null}
error: no matching function
error: undeclared identifier
```
属于源码 / C++ API 层。
### 链接错误
典型:
```text theme={null}
undefined reference
```
属于符号 / library / ABI / link flags 层。
### import 错误
典型:
```text theme={null}
undefined symbol
cannot open shared object file
```
属于动态加载 / ABI / runtime library 层。
***
# 8. 性能工程视角:这节课真正要建立的思维
***
## 8.1 从“值”升级到“Buffer”
初学编程看:
```text theme={null}
变量的值是多少?
```
AI Infra 要继续问:
```text theme={null}
这个值在哪个 Buffer?
Buffer 在 CPU 还是 GPU?
地址是什么?
stride 是什么?
谁拥有它?
什么时候释放?
是否需要 copy?
哪个 Stream 正在使用?
```
***
## 8.2 从“函数”升级到“边界”
看到:
```python theme={null}
y = custom_op(x)
```
不要只想:
> custom\_op 做了什么数学运算?
还要问:
```text theme={null}
Python → C++ 有没有转换?
C++ → CUDA 有没有 memcpy?
有没有 device sync?
有没有 GIL?
有没有创建临时 Tensor?
有没有 contiguous copy?
有没有 allocator 开销?
```
***
## 8.3 从“代码正确”升级到“生命周期正确”
一个 C++ 函数即使数学公式对,也可能因为:
* use-after-free;
* data race;
* dangling pointer;
* double free;
* async lifetime;
* stream ordering;
而完全不可用。
这也是 C++ 对 AI Infra 工程师的重要性。
***
# 9. 本讲自测 Checklist
学完这一讲,你应该能回答:
* [ ] Python 为什么适合做编排,但不适合承担所有性能敏感路径?
* [ ] GIL 限制的究竟是什么?
* [ ] 指针和引用的核心区别是什么?
* [ ] 什么是对象生命周期?
* [ ] RAII 为什么比“记得 free”更可靠?
* [ ] `unique_ptr` 和 `shared_ptr` 如何选择?
* [ ] `std::move` 本身是否真的移动数据?
* [ ] 什么叫 moved-from valid but unspecified state?
* [ ] 为什么模板适合 dtype dispatch?
* [ ] Python `list` 转 `std::vector` 为什么通常不是 Zero-Copy?
* [ ] PyBind11 在跨语言调用里解决了什么?
* [ ] 什么情况下可以释放 GIL?
* [ ] `at::Tensor` 为什么不是整块 Tensor 数据本身?
* [ ] Storage / TensorImpl / Tensor handle 大致是什么关系?
* [ ] shape 和 stride 为什么必须同时理解?
* [ ] `torch.utils.cpp_extension.load` 做了什么?
* [ ] JIT 与 AOT Extension 有什么区别?
* [ ] 为什么自定义 CUDA Kernel 需要额外处理 Autograd?
* [ ] C++ Extension 报错时如何区分 compile / link / import?
* [ ] 为什么“用 C++ 重写”不一定自动变快?
***
# 10. 课后练习
***
## 练习 1:修改 C++ Add
把:
```cpp theme={null}
return a + b;
```
修改成:
```cpp theme={null}
return a * 2 + b;
```
然后在 Python 中验证结果。
***
## 练习 2:增加 dtype 检查
只允许:
```text theme={null}
float32
```
其他 dtype 抛出:
```cpp theme={null}
TORCH_CHECK(...)
```
***
## 练习 3:测试非 contiguous Tensor
Python:
```python theme={null}
x = torch.randn(4, 8)
y = x.transpose(0, 1)
print(y.is_contiguous())
print(y.stride())
```
观察你的 C++ 算子是否仍然正确。
***
## 练习 4:观察 Tensor 共享
Python:
```python theme={null}
x = torch.arange(10)
y = x.view(2, 5)
print(x.data_ptr())
print(y.data_ptr())
```
理解:
```text theme={null}
不同 Tensor view
可以共享底层 Storage
```
***
## 练习 5:比较 list 与 Tensor 边界
分别实现:
```text theme={null}
PyBind11: list -> vector -> list
PyTorch: Tensor -> Tensor
```
输入 100 万个 float,测量两种接口。
重点不要只看 C++ 循环时间,还要看:
```text theme={null}
boundary conversion
```
***
## 练习 6:实现 RAII Buffer
实现:
```cpp theme={null}
class Buffer
```
要求:
* 构造时申请内存;
* 析构时释放;
* 禁止复制;
* 支持移动;
* 可以查询 size。
***
# 11. Ringi 总结
这一讲最重要的不是:
```text theme={null}
记住多少 C++ 关键字
```
而是建立六个意识。
***
## 第一:所有权意识
任何资源都要问:
```text theme={null}
Who owns it?
```
***
## 第二:生命周期意识
任何指针都要问:
```text theme={null}
How long does it live?
```
***
## 第三:数据布局意识
任何 Tensor 都要问:
```text theme={null}
dtype?
shape?
stride?
device?
contiguous?
storage?
```
***
## 第四:边界意识
任何 Python/C++ 调用都要问:
```text theme={null}
有没有类型转换?
有没有 copy?
有没有 GIL?
调用次数多不多?
```
***
## 第五:异步意识
任何 GPU 操作都要问:
```text theme={null}
在哪个 Stream?
什么时候真正完成?
什么时候才能释放?
```
***
## 第六:测量意识
任何性能优化都要先问:
```text theme={null}
瓶颈真的在这里吗?
```
***
你最终要形成这样的思维链:
```text theme={null}
Python API
↓
Python object / Tensor wrapper
↓
C++ binding
↓
ATen / Dispatcher
↓
TensorImpl / Storage
↓
CPU / CUDA implementation
↓
Runtime / Driver
↓
Hardware
```
能够顺着这条链一路往下追,你才真正迈进了 AI Infra 的门。
***
# 12. 下一讲承接
下一讲建议进入:
> **第02讲:GPU 执行模型与 CUDA C++ 入门——Thread / Block / Grid / Warp / Memory Hierarchy**
这一讲学到的:
* 指针;
* RAII;
* 模板;
* Tensor Storage;
* C++ Extension;
都会在 CUDA 中直接复用。
下一讲会继续回答:
```text theme={null}
一个 Tensor 的 data_ptr
到底如何被成千上万个 GPU Thread 并行处理?
```
以及:
```text theme={null}
为什么写对一个 CUDA Kernel 很容易,
写快一个 CUDA Kernel 却非常难?
```
***
# 附录 A:最小代码包
## A.1 `op.cpp`
```cpp theme={null}
#include
torch::Tensor custom_add(
const torch::Tensor& a,
const torch::Tensor& b
) {
TORCH_CHECK(
a.device() == b.device(),
"device mismatch"
);
TORCH_CHECK(
a.scalar_type() == b.scalar_type(),
"dtype mismatch"
);
TORCH_CHECK(
a.sizes() == b.sizes(),
"shape mismatch"
);
return a + b;
}
PYBIND11_MODULE(TORCH_EXTENSION_NAME, m) {
m.def(
"custom_add",
&custom_add,
"Ringi custom add"
);
}
```
## A.2 `test_cpp_extension.py`
```python theme={null}
from pathlib import Path
import torch
from torch.utils.cpp_extension import load
ROOT = Path(__file__).resolve().parent
ext = load(
name="ringi_custom_add_ext",
sources=[str(ROOT / "op.cpp")],
extra_cflags=["-O3", "-std=c++17"],
verbose=True,
)
a = torch.randn(
1024,
dtype=torch.float64,
requires_grad=True,
)
b = torch.randn(
1024,
dtype=torch.float64,
requires_grad=True,
)
actual = ext.custom_add(a, b)
expected = a + b
torch.testing.assert_close(
actual,
expected,
)
loss = actual.sum()
loss.backward()
torch.testing.assert_close(
a.grad,
torch.ones_like(a),
)
torch.testing.assert_close(
b.grad,
torch.ones_like(b),
)
print("ALL TESTS PASSED")
```
***
# 附录 B:参考资料
> 本文基于课程大纲重新组织与原创撰写,并参考以下项目/官方文档用于知识校验与延伸阅读。
1. AIInfraGuide:编程语言基础\
[https://github.com/caomaolufei/AIInfraGuide/blob/main/docs/guides/%E6%A8%A1%E5%9D%97%E4%B8%80-%E5%89%8D%E7%BD%AE%E7%9F%A5%E8%AF%86/%E7%AC%AC1%E7%AB%A0-%E7%BC%96%E7%A8%8B%E8%AF%AD%E8%A8%80%E5%9F%BA%E7%A1%80.md](https://github.com/caomaolufei/AIInfraGuide/blob/main/docs/guides/%E6%A8%A1%E5%9D%97%E4%B8%80-%E5%89%8D%E7%BD%AE%E7%9F%A5%E8%AF%86/%E7%AC%AC1%E7%AB%A0-%E7%BC%96%E7%A8%8B%E8%AF%AD%E8%A8%80%E5%9F%BA%E7%A1%80.md)
2. lilinji / DevopsBooklet:Python 实例手册增强完善版\
[https://github.com/lilinji/DevopsBooklet/blob/master/Python%E5%AE%9E%E4%BE%8B%E6%89%8B%E5%86%8C\_%E5%A2%9E%E5%BC%BA%E5%AE%8C%E5%96%84%E7%89%88.md](https://github.com/lilinji/DevopsBooklet/blob/master/Python%E5%AE%9E%E4%BE%8B%E6%89%8B%E5%86%8C_%E5%A2%9E%E5%BC%BA%E5%AE%8C%E5%96%84%E7%89%88.md)
3. PyTorch Documentation:Custom C++ and CUDA Operators\
[https://docs.pytorch.org/tutorials/advanced/cpp\_custom\_ops.html](https://docs.pytorch.org/tutorials/advanced/cpp_custom_ops.html)
4. PyTorch Documentation:`torch.utils.cpp_extension`\
[https://docs.pytorch.org/docs/stable/cpp\_extension.html](https://docs.pytorch.org/docs/stable/cpp_extension.html)
5. PyTorch Documentation:Extending PyTorch\
[https://docs.pytorch.org/docs/stable/notes/extending.html](https://docs.pytorch.org/docs/stable/notes/extending.html)
6. PyTorch Documentation:`torch.library`\
[https://docs.pytorch.org/docs/stable/library.html](https://docs.pytorch.org/docs/stable/library.html)
7. PyBind11 Documentation:STL Containers\
[https://pybind11.readthedocs.io/en/stable/advanced/cast/stl.html](https://pybind11.readthedocs.io/en/stable/advanced/cast/stl.html)
8. PyBind11 Documentation:Global Interpreter Lock\
[https://pybind11.readthedocs.io/en/stable/advanced/misc.html](https://pybind11.readthedocs.io/en/stable/advanced/misc.html)
9. CPython Documentation:Free-threaded Python\
[https://docs.python.org/3/howto/free-threading-python.html](https://docs.python.org/3/howto/free-threading-python.html)
10. PyTorch Source:ATen `TensorBase` / `TensorImpl`\
[https://github.com/pytorch/pytorch/blob/main/aten/src/ATen/core/TensorBase.h](https://github.com/pytorch/pytorch/blob/main/aten/src/ATen/core/TensorBase.h)\
[https://github.com/pytorch/pytorch/blob/main/c10/core/TensorImpl.h](https://github.com/pytorch/pytorch/blob/main/c10/core/TensorImpl.h)
***
> **Ringi 的一句话复盘:**\
> Python 让你快速调用 AI 系统;C++ 让你真正看见这个系统如何管理内存、调度算子、连接 GPU,并最终解释“为什么它快、为什么它慢、为什么它挂”。
This documentation is built and hosted on [Mintlify](https://mintlify.com), a developer documentation platform.